前言
环境信息
- 系统:Windows
- Hugo:v0.141.0
- PaperMod: 8.0
部署环境及方式
Linux服务器 + 宝塔面板
大致步骤
大致步骤可以分为以下几步:
- 环境准备
- Github 建仓(用于备份)
- 博客搭建
- 博客配置
准备基本环境
在搭建博客之前,需要准备基本的环境,需下载并安装:
- Hugo
- Git
- Node.js
安装 Hugo
参考 Hugo 官方提供的下载文档及链接,地址如下,需要注意的是,请安装 extended 版本的 Hugo。
https://gohugo.io/installation/
安装 Git
参考 Git 官方提供的下载文档及链接,地址如下。
https://git-scm.com/book/en/v2/Getting-Started-Installing-Git
安装 Node.js
Node.js 官方下载地址如下,下载 LST 版本的即可。
提示
LST 的意思就是长期支持版
在 Github 创建仓库
打开自己的 Github,在 Github 创建完仓库后,将改仓库克隆到本地。我的仓库名称为:Blog
提示
如果平时不使用 Github 的话也可以使用其他的代码托管平台,甚至你可以不使用,跳过这个步骤。我使用的目的是备份博客文章以及配置文件等。
博客搭建
下载 PaperMod 主题
PaperMode 主题压缩包下载地址如下。下载完后放到桌面或是放到那个文件夹都行,一会用到的时候你能找到就可以。
https://github.com/adityatelange/hugo-PaperMod/wiki/Installation
使用 Hugo 创建博客
如果你跳过了 “在 Github 创建仓库” ,可以直接在桌面新建一个 Blog 文件夹。
- 打开 终端管理员,进入
Blog文件夹,运行代码。
hugo new site Gdh-PaperMod-Blog
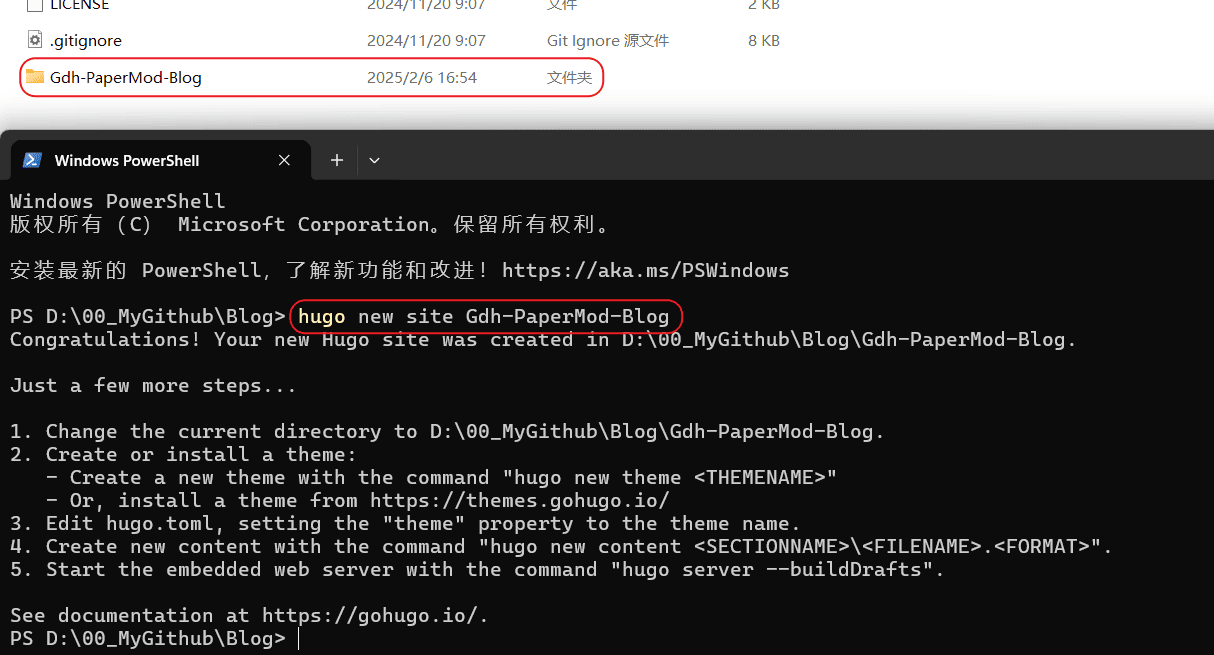
下面 Gdh-PaperMod-Blog 文件夹说明
D:\00MyGithub\Blog\Gdh-PaperMod-Blog

│  hugo.toml # 博客网站的配置文件(博客名称、版权信息)等
│
├─archetypes
│      default.md # 新建文章时头部的模板
│
├─assets
├─content # 博客所读取的各类页面所在的目录,包括主页面(主页、关于、存档等这种大类)和文章
├─data
├─i18n
├─layouts # 博客网站的布局文件
├─static # 静态内容
└─themes # 存放博客主题,是我们接下来要阐述的重点
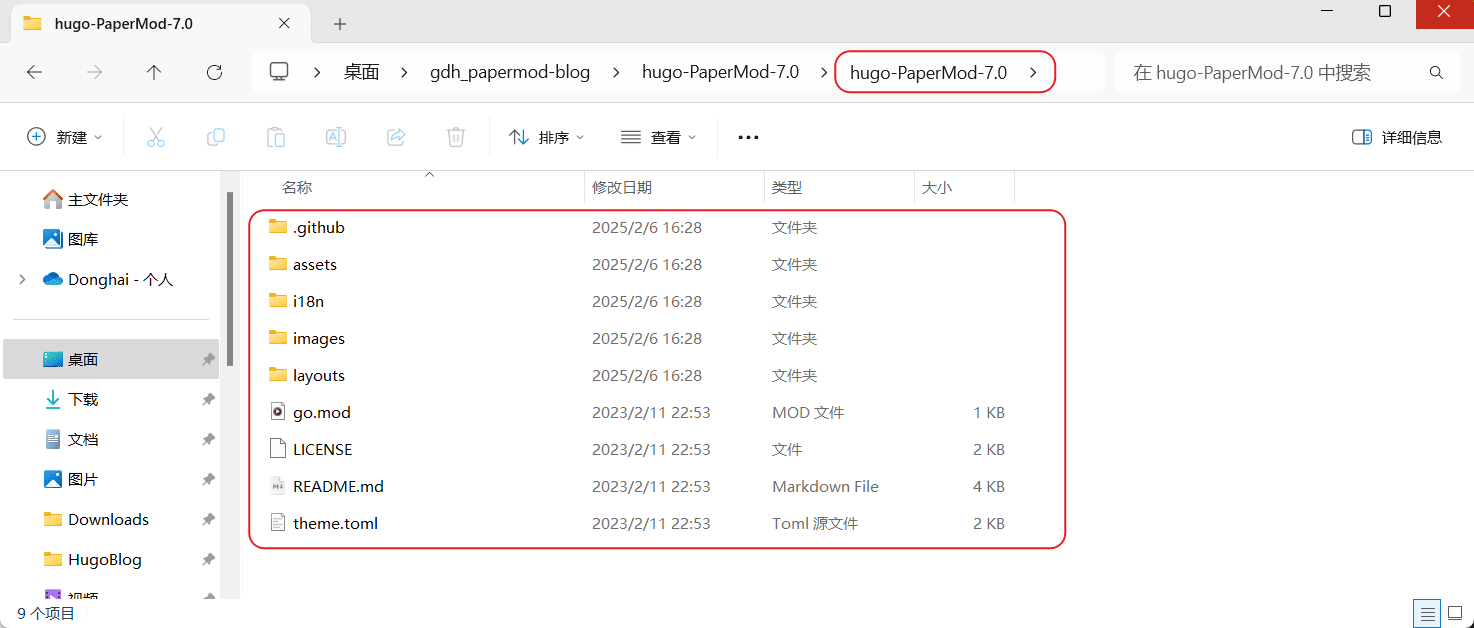
添加主题
为 themes 添加 PaperMod 主题。将上面下载的 PaperMod 主题压缩包进行解压缩,然后拷贝到 themes 文件夹。注意,拷贝的压缩包是里边这层,有内容的,不要傻愣愣的直接拷贝进去。
简单地配置博客
将目录中的 hugo.toml 删掉,然后新建 hugo.yaml 文件。
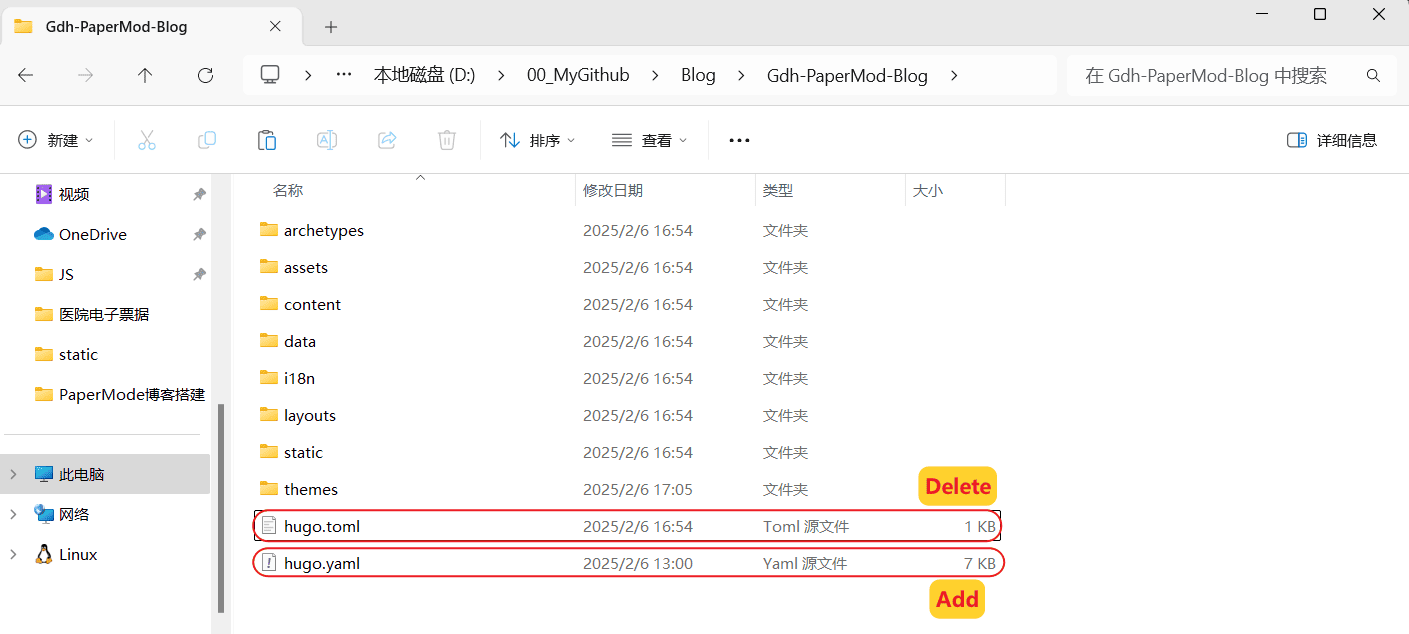
打开 hugo.yaml 将下面的内容复制粘贴进去并保存。
baseURL: "https://gdhblog.com/" # Blog域名
paginate: 10 # 首页每页显示的文章数
theme: hugo-PaperMod-7.0 # themes文件夹中 PaperMod 主题文件夹名称
title: 我的博客
至此,我们已经搭建了一个简单的博客。先试试看,能不能跑起来。
- 打开 终端管理员,进入
Gdh-PaperMod-Blog文件夹,运行代码。
hugo server
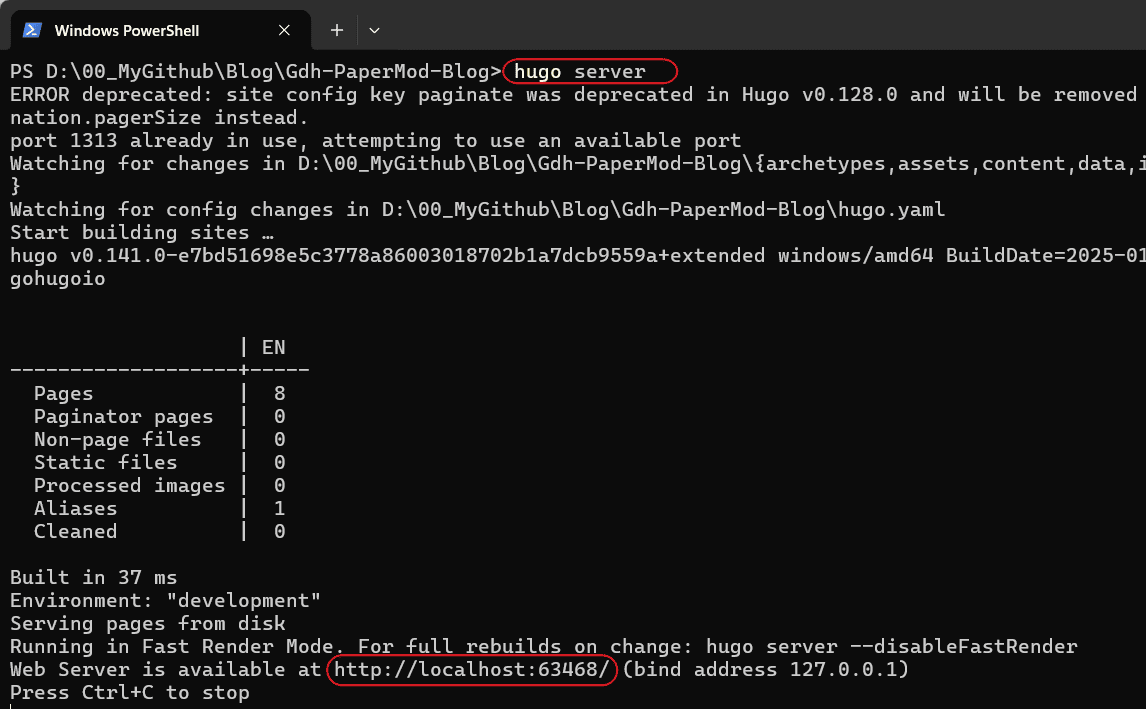
已经在本地跑起来了。

博客装修
我们可以看到,现在博客基本都是空白的,除了左上角的标题,什么都没有,接下来我们要对 hugo.yaml 进行配置,以满足自己博客的需求。
基本需求
搭建自己的博客时,我们需要先明确自己的需求,这样做起来才会更加清晰有条理。以下是我认为博客需要具备的基本功能:
- 菜单
| 序号 | 菜单(Zh) | 菜单(En) |
|---|---|---|
| 1 | 搜索 | Search |
| 2 | 文章 | Post |
| 3 | 分类 | Categories |
| 4 | 归档 | Archives |
| 5 | 标签 | Tags |
| 6 | 关于 | About |
| 7 | 友情链接 | Links |
| 8 | RSS | RSS |
支持多语言(中文和英文)
评论
配置 hugo.yaml
下面是我的 hugo.yaml 配置文件,供参考。如果你是第一次搭建的话,可以直接拷贝,然后根据自己的需求进行修改,大多数参数都写上了注释。
hugo.yaml
baseURL: "https://yourBlogDomain.com/" # 博客域名
paginate: 10 # 首页每页显示的文章数
theme: hugo-PaperMod-7.0

enableRobotsTXT: true # 允许爬虫抓取到搜索引擎,建议 true
hasCJKLanguage: true # 自动检测是否包含 中文日文韩文 如果文章中使用了很多中文引号的话可以开启
buildDrafts: false # 这个选项控制是否在构建站点时包括标记为草稿的内容
buildFuture: false # 这个选项控制是否在构建站点时包括未来发布日期的内容。
buildExpired: false # 这个选项控制是否在构建站点时包括过期的内容。将其设置为 false 意味着在生产环境中不会包括过期的文章。这可以确保你的站点只显示最新和相关的内容
minify:
  disableXML: true # true 将禁用 XML 站点地图的生成。如果你不需要 XML 站点地图,这可以减少构建时间
  minifyOutput: true # true 会压缩 HTML、CSS 和 JavaScript 文件,从而减小页面的文件大小,提高页面加载速度

params:
  env: production # to enable google analytics, opengraph, twitter-cards and schema.
  keywords: [
      keywords1,
      keywords2,
      keywords3,
    ] # 首页的关键词
  displayFullLangName: true
  label: # 左上角图标
    icon: "img/favicon.gif" # 图片路径:/static/img
    iconHeight: 35

  images: ["<link or path of image for opengraph, twitter-cards>"]
  DateFormat: "2006-01-02" # 将时间格式修改为国内常用格式
  defaultTheme: auto # dark, light
  disableThemeToggle: false
  ShowReadingTime: true # 阅读文章时间
  ShowShareButtons: false # 文章底部的分享按钮
  ShowPostNavLinks: true
  ShowBreadCrumbs: true # 显示面包屑导航
  ShowCodeCopyButtons: true
  ShowWordCount: true
  ShowRssButtonInSectionTermList: true
  UseHugoToc: true
  disableSpecial1stPost: false
  disableScrollToTop: false
  comments: true # 文章评论
  hidemeta: false
  hideSummary: true # 隐藏文章摘要
  showtoc: true # 显示文章目录
  tocopen: true # 默认打开文章目录

  assets:
    # disableHLJS: true # to disable highlight.js
    # disableFingerprinting: true
    favicon: "img/favicon.gif" # 图片路径:/static/img
    favicon16x16: "img/favicon.gif"
    favicon32x32: "img/favicon.gif"
    apple_touch_icon: "img/favicon.gif"
    safari_pinned_tab: "img/favicon.gif"

  cover:
    hidden: true # hide everywhere but not in structured data
    hiddenInList: true # hide on list pages and home
    hiddenInSingle: true # hide on single page

  # for search
  # https://fusejs.io/api/options.html
  fuseOpts:
    isCaseSensitive: false
    shouldSort: true
    location: 0
    distance: 1000
    threshold: 0.4
    minMatchCharLength: 0
    limit: 10 # refer: https://www.fusejs.io/api/methods.html#search
    keys: ["title", "permalink", "summary", "content"]

# Read: https://github.com/adityatelange/hugo-PaperMod/wiki/FAQs#using-hugos-syntax-highlighter-chroma
pygmentsUseClasses: true
markup:
  highlight:
    # noClasses: false
    anchorLineNos: true
    codeFences: true
    guessSyntax: true # 猜测语法,这个功能建议设置为 true, 如果你没有设置要显示的语言则会自动匹配
    lineNos: true # 是否显示行号
    style: monokai

# 多语言配置
defaultContentLanguage: en # 默认语言为英文
defaultContentLanguageInSubdir: false # 默认语言也使用子目录(如 /en/)
languages:
  en: # 英文语言配置
    title: Rickey's blog
    description: "I sincerely document this because life is worth it."
    weight: 2
    languageCode: en-us
    languageName: "English"
    params:
      author: Rickey # 文章中默认显示的作者名字
      social: true
      # 首页博主简介
      profileMode:
        enabled: true
        title: "Rickey Gong"
        subtitle: "I sincerely document this because life is worth it."
        imageUrl: "avatar.png" # 图片需要放到static文件夹下
        imageWidth: 120
        imageHeight: 120
        imageTitle: "Welcome to Rickey's blog"
        buttons:
          - name: Posts
            url: posts
          - name: Archives
            url: archives
          - name: Links
            url: friends
          - name: Please have a coffee
            url: donate
      # 社交平台小图标,参考:https://adityatelange.github.io/hugo-PaperMod/posts/papermod/papermod-icons/
      socialIcons:
        - name: github
          url: "https://github.com/rickeygong/"
        - name: email
          url: "mailto:donghai.gong@outlook.com"
        - name: rss
          url: /index.xml/
        - name: bilibili
          url: "https://space.bilibili.com/14020906"
        - name: linkedin
          url: "https://linkedin.com/in/donghai-gong-11a74b225"
    # 菜单顺序(英文)
    # Search,Posts,Categories,Archives,Tags,About,Links,RSS
    # weight 是权重的意思,从 1~8 表示右上角菜单按钮的顺序(从左往右)
    menu:
      main:
        - identifier: search
          name: Search
          url: /search/
          weight: 1
        - identifier: posts
          name: Posts
          url: /posts/
          weight: 2
        - identifier: categories
          name: Categories
          url: /categories/
          weight: 3
        - identifier: archives
          name: Archives
          url: /archives/
          weight: 4
        - identifier: tags
          name: Tags
          url: /tags/
          weight: 5
        - identifier: about
          name: About
          url: /about/
          weight: 6
        - identifier: friends
          name: Links
          url: /friends/
          weight: 7
        - identifier: rss
          name: RSS
          url: index.xml
          weight: 8

  zh: # 中文语言配置
    title: 龚东海的博客
    description: "我真诚地记录着,因为生活值得"
    weight: 1
    languageCode: zh-cn
    languageName: "简体中文"
    params:
      author: 龚东海 # 文章中默认显示的作者名字
      social: true
      # 首页博主简介
      profileMode:
        enabled: true
        title: "龚东海"
        subtitle: "我真诚地记录着,因为生活值得。"
        imageUrl: "avatar.png" # 图片需要放到static文件夹下
        imageWidth: 120
        imageHeight: 120
        imageTitle: "欢迎来到龚东海的博客"
        buttons:
          - name: 文章
            url: posts
          - name: 归档
            url: archives
          - name: 友链
            url: friends
          - name: 请喝咖啡
            url: donate
      # 社交平台小图标,参考:https://adityatelange.github.io/hugo-PaperMod/posts/papermod/papermod-icons/
      socialIcons:
        - name: github
          url: "https://github.com/rickeygong/"
        - name: email
          url: "mailto:donghai.gong@outlook.com"
        - name: rss
          url: /index.xml/
        - name: bilibili
          url: "https://space.bilibili.com/14020906"
        - name: linkedin
          url: "https://linkedin.com/in/donghai-gong-11a74b225"
    # 菜单顺序(中文)
    # 搜索,文章,分类,归档,标签,关于,友情链接,RSS
    menu:
      main:
        - identifier: search
          name: 搜索
          url: /search/
          weight: 1
        - identifier: posts
          name: 文章
          url: /posts/
          weight: 2
        - identifier: categories
          name: 分类
          url: /categories/
          weight: 3
        - identifier: archives
          name: 归档
          url: /archives/
          weight: 4
        - identifier: tags
          name: 标签
          url: /tags/
          weight: 5
        - identifier: about
          name: 关于
          url: /about/
          weight: 6
        - identifier: friends
          name: 友情链接
          url: /friends/
          weight: 7
        - identifier: rss
          name: RSS
          url: index.xml
          weight: 8

# ----- [Begin]. 搜索配置 -----
outputs:
  home:
    - HTML
    - RSS
    - JSON
# ----- [End]. 搜索配置 -----
多语言
Hugo 多语言内容管理有多种方法,感兴趣的可以参考 Huho 文档 多语言模式 章节。
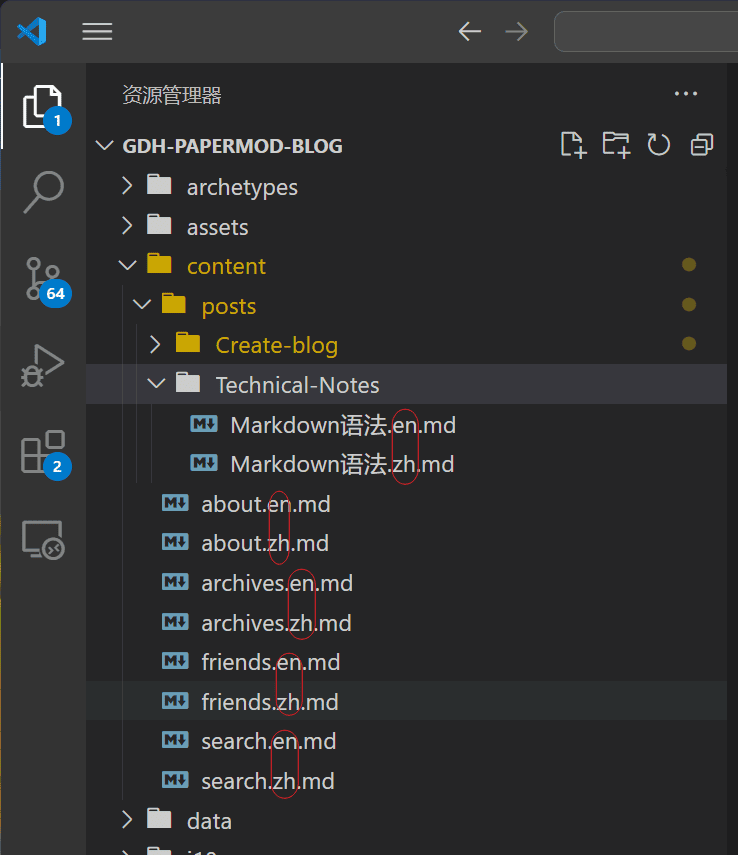
这里我采用的是 “用文件名翻译” ,例如:
- 文件名.zh.md
- 文件名.en.md
添加页面
搜索页
- 在
content文件夹下依次新添文件search.en.md和search.zh.md - 在
hugo.yaml文件添加搜索配置信息
search.en.md
---
title: "Search" # in any language you want
layout: "search" # necessary for search
summary: "search"
placeholder: "placeholder text in search input box"
---
search.zh.md
---
title: "搜索" # in any language you want
layout: "search" # necessary for search
summary: "search"
placeholder: ""
---
hugo.yaml 文件添加搜索配置信息
# ----- [Begin]. 搜索配置 -----
outputs:
  home:
    - HTML
    - RSS
    - JSON
# ----- [End]. 搜索配置 -----
归档页
在 content 文件夹下添加 archives.en.md 和 archives.zh.md 文件。
archives.en.md
---
title: "Archive"
layout: "archives"
url: "/archives/"
summary: archives
---
archives.zh.md
---
title: "归档"
layout: "archives"
summary: archives
---
友情链接
- 在
layouts/shortcodes/文件夹下新添friends.html文件 (如果没有shortcodes文件夹,新建即可) - 在
content文件夹下添加friends.en.md和friends.zh.md文件
friends.html 代码如下。
friends.html
<style>
    .friendurl {
        text-decoration: none !important;
        color: var(--primary) !important;
        box-shadow: none !important;
    }

    .myfriend {
        width: 56px !important;
        height: 56px !important;
        border-radius: 50% !important;
        padding: 2px;
        margin-top: 20px !important;
        margin-left: 14px !important;
        background-color: #fff;
    }

    .frienddiv {
        overflow: auto;
        height: 100px;
        width: 49%;
        display: inline-block !important;
        border-radius: 5px;
        background: none;

        -webkit-transition: box-shadow 0.4s ease, transform 0.4s ease;
        -moz-transition: box-shadow 0.4s ease, transform 0.4s ease;
        -o-transition: box-shadow 0.4s ease, transform 0.4s ease;

        transition: box-shadow 0.4s ease, transform 0.4s ease;
    }

    .frienddiv:hover {
        background: var(--code-bg);
        transition: box-shadow 1s ease, transform 1s ease;
    }

    .dark .frienddiv:hover {
        background: var(--code-bg);
        transition: box-shadow 1s ease, transform 1s ease;
    }

    .frienddiv:hover .frienddivleft img {
        transition: 0.9s !important;
        transform: rotate(360deg) !important;
    }

    .frienddivleft {
        width: 92px;
        float: left;
        margin-right: -5px;
    }

    .frienddivright {
        margin-top: 18px;
        margin-right: 18px;
    }

    .friendname {
        text-overflow: ellipsis;
        font-size: 100%;
        margin-bottom: 5px;
        color: var(--primary);
    }

    .friendinfo {
        text-overflow: ellipsis;
        font-size: 70%;
        color: var(--primary);
    }

    @media screen and (max-width: 600px) {
        .friendinfo {
            display: none;
        }

        .frienddivleft {
            width: 84px;
            margin: auto;
        }

        .frienddivright {
            height: 100%;
            margin: auto;
            display: flex;
            align-items: center;
            justify-content: center;
        }

        .friendname {
            font-size: 18px;
        }
    }

    .site-friend-link-image {
        border-radius: 50% !important;
    }

    .site-friend:hover img {
        transition: 0.9s !important;
        transform: rotate(360deg) !important;
    }
</style>

{{- if .IsNamedParams -}}
<a target="_blank" href={{ .Get "url" }} title={{if .Get "title" }} {{.Get "title" }} {{else}} {{.Get "name" }} {{end}}
    class="friendurl">
    <div class="frienddiv">
        <div class="frienddivleft">
            <img class="myfriend" src={{ .Get "logo" }} />
        </div>
        <div class="frienddivright">
            <div class="friendname">{{- .Get "name" -}}</div>
            <div class="friendinfo">{{- .Get "word" -}}</div>
        </div>
    </div>
</a>
{{- end }}
编辑 friends.en.md 、 friends.zh.md 文件
---
title: "友情链接"
draft: false
ShowReadingTime: false
showToc: false
TocOpen: false
enableCopyright: false
---
<!-- 将 $ 符号去掉 -->
{${< friends name="龚东海的博客" url="https://gdhblog.com" logo="https://gdhblog.com/avatar.png" word="真诚记录,生活值得" >}}
About 页
在
content文件夹下添加about.en.md和about.zh.md文件。写上内容,保存。
侧边悬浮目录
悬浮目录是一种便于用户阅读的目录形式。相比固定在文章顶部的传统目录,悬浮目录能够随着页面滚动而持续显示在视野中,让读者随时掌握文章结构,更容易进行快速定位和跳转。这种交互方式有利于提升用户的阅读体验。
- 在
layouts/partials添加toc.html文件 - 在
assets/css/extended添加toc.css文件
提示
如果没有文件夹,自己新建即可。下面是 toc.html 文件和 toc.css 文件 代码。
toc.html
{{- $headers := findRE "<h[1-6].*?>(.|\n])+?</h[1-6]>" .Content -}}
    {{- $has_headers := ge (len $headers) 1 -}}
    {{- if $has_headers -}}
    <aside id="toc-container" class="toc-container wide">
        <div class="toc">
            <details {{if (.Param "TocOpen" ) }} open{{ end }}>
                <summary accesskey="c" title="(Alt + C)">
                    <span class="details">{{- i18n "toc" | default "Table of Contents" }}</span>
                </summary>

                <div class="inner">
                    {{- $largest := 6 -}}
                    {{- range $headers -}}
                    {{- $headerLevel := index (findRE "[1-6]" . 1) 0 -}}
                    {{- $headerLevel := len (seq $headerLevel) -}}
                    {{- if lt $headerLevel $largest -}}
                    {{- $largest = $headerLevel -}}
                    {{- end -}}
                    {{- end -}}

                    {{- $firstHeaderLevel := len (seq (index (findRE "[1-6]" (index $headers 0) 1) 0)) -}}

                    {{- $.Scratch.Set "bareul" slice -}}
                    <ul>
                        {{- range seq (sub $firstHeaderLevel $largest) -}}
                        <ul>
                            {{- $.Scratch.Add "bareul" (sub (add $largest .) 1) -}}
                            {{- end -}}
                            {{- range $i, $header := $headers -}}
                            {{- $headerLevel := index (findRE "[1-6]" . 1) 0 -}}
                            {{- $headerLevel := len (seq $headerLevel) -}}

                            {{/* get id="xyz" */}}
                            {{- $id := index (findRE "(id=\"(.*?)\")" $header 9) 0 }}

                            {{- /* strip id="" to leave xyz, no way to get regex capturing groups in hugo */ -}}
                            {{- $cleanedID := replace (replace $id "id=\"" "") "\"" "" }}
                            {{- $header := replaceRE "<h[1-6].*?>((.|\n])+?)</h[1-6]>" "$1" $header -}}

                                {{- if ne $i 0 -}}
                                {{- $prevHeaderLevel := index (findRE "[1-6]" (index $headers (sub $i 1)) 1) 0 -}}
                                {{- $prevHeaderLevel := len (seq $prevHeaderLevel) -}}
                                {{- if gt $headerLevel $prevHeaderLevel -}}
                                {{- range seq $prevHeaderLevel (sub $headerLevel 1) -}}
                                <ul>
                                    {{/* the first should not be recorded */}}
                                    {{- if ne $prevHeaderLevel . -}}
                                    {{- $.Scratch.Add "bareul" . -}}
                                    {{- end -}}
                                    {{- end -}}
                                    {{- else -}}
                                    </li>
                                    {{- if lt $headerLevel $prevHeaderLevel -}}
                                    {{- range seq (sub $prevHeaderLevel 1) -1 $headerLevel -}}
                                    {{- if in ($.Scratch.Get "bareul") . -}}
                                </ul>
                                {{/* manually do pop item */}}
                                {{- $tmp := $.Scratch.Get "bareul" -}}
                                {{- $.Scratch.Delete "bareul" -}}
                                {{- $.Scratch.Set "bareul" slice}}
                                {{- range seq (sub (len $tmp) 1) -}}
                                {{- $.Scratch.Add "bareul" (index $tmp (sub . 1)) -}}
                                {{- end -}}
                                {{- else -}}
                        </ul>
                        </li>
                        {{- end -}}
                        {{- end -}}
                        {{- end -}}
                        {{- end }}
                        <li>
                            <a href="#{{- $cleanedID -}}" aria-label="{{- $header | plainify -}}">{{- $header | safeHTML
                                -}}</a>
                            {{- else }}
                        <li>
                            <a href="#{{- $cleanedID -}}" aria-label="{{- $header | plainify -}}">{{- $header | safeHTML
                                -}}</a>
                            {{- end -}}
                            {{- end -}}
                            <!-- {{- $firstHeaderLevel := len (seq (index (findRE "[1-6]" (index $headers 0) 1) 0)) -}} -->
                            {{- $firstHeaderLevel := $largest }}
                            {{- $lastHeaderLevel := len (seq (index (findRE "[1-6]" (index $headers (sub (len $headers)
                            1)) 1) 0)) }}
                        </li>
                        {{- range seq (sub $lastHeaderLevel $firstHeaderLevel) -}}
                        {{- if in ($.Scratch.Get "bareul") (add . $firstHeaderLevel) }}
                    </ul>
                    {{- else }}
                    </ul>
                    </li>
                    {{- end -}}
                    {{- end }}
                    </ul>
                </div>
            </details>
        </div>
    </aside>
    <script>
        let activeElement;
        let elements;
        window.addEventListener('DOMContentLoaded', function (event) {
            checkTocPosition();

            elements = document.querySelectorAll('h1[id],h2[id],h3[id],h4[id],h5[id],h6[id]');
            // Make the first header active
            activeElement = elements[0];
            const id = encodeURI(activeElement.getAttribute('id')).toLowerCase();
            document.querySelector(`.inner ul li a[href="#${id}"]`).classList.add('active');
        }, false);

        window.addEventListener('resize', function (event) {
            checkTocPosition();
        }, false);

        window.addEventListener('scroll', () => {
            // Check if there is an object in the top half of the screen or keep the last item active
            activeElement = Array.from(elements).find((element) => {
                if ((getOffsetTop(element) - window.pageYOffset) > 0 &&
                    (getOffsetTop(element) - window.pageYOffset) < window.innerHeight / 2) {
                    return element;
                }
            }) || activeElement

            elements.forEach(element => {
                const id = encodeURI(element.getAttribute('id')).toLowerCase();
                if (element === activeElement) {
                    document.querySelector(`.inner ul li a[href="#${id}"]`).classList.add('active');
                } else {
                    document.querySelector(`.inner ul li a[href="#${id}"]`).classList.remove('active');
                }
            })
        }, false);

        const main = parseInt(getComputedStyle(document.body).getPropertyValue('--article-width'), 10);
        const toc = parseInt(getComputedStyle(document.body).getPropertyValue('--toc-width'), 10);
        const gap = parseInt(getComputedStyle(document.body).getPropertyValue('--gap'), 10);

        function checkTocPosition() {
            const width = document.body.scrollWidth;

            if (width - main - (toc * 2) - (gap * 4) > 0) {
                document.getElementById("toc-container").classList.add("wide");
            } else {
                document.getElementById("toc-container").classList.remove("wide");
            }
        }

        function getOffsetTop(element) {
            if (!element.getClientRects().length) {
                return 0;
            }
            let rect = element.getBoundingClientRect();
            let win = element.ownerDocument.defaultView;
            return rect.top + win.pageYOffset;
        }
    </script>
    {{- end }}
toc.css
:root {
    --article-width: 650px;
    --toc-width: 230px;
  }

  .toc {
    margin: 0 2px 40px 2px;
    border: 1px solid var(--border);
    background: var(--entry);
    border-radius: var(--radius);
    padding: 0.4em;
  }

  .toc-container.wide {
    position: absolute;
    height: 100%;
    border-right: 1px solid var(--border);
    left: calc((var(--toc-width) * 0.9 + var(--gap)) * -1);
    top: calc(var(--gap) * 2);
    width: var(--toc-width);
  }

  .wide .toc {
    position: sticky;
    top: var(--gap);
    border: unset;
    background: unset;
    border-radius: unset;
    width: 100%;
    margin: 0 2px 40px 2px;
  }

  .toc details summary {
    cursor: zoom-in;
    margin-inline-start: 20px;
    padding: 12px 0;
  }

  .toc details[open] summary {
    font-weight: 500;
  }

  .toc-container.wide .toc .inner {
    margin: 0;
  }

  .toc .active {
    font-size: 110%;
    font-weight: 600;
    color: #614a85;
    text-decoration: underline;
  }

  .toc ul {
    list-style-type: circle;
  }

  .toc .inner {
    margin: 0 0 0 20px;
    padding: 0px 15px 15px 20px;
    font-size: 16px;

    max-height: 83vh;
    overflow-y: auto;
  }

  .toc .inner::-webkit-scrollbar-thumb {
    background: var(--border);
    border: 7px solid var(--theme);
    border-radius: var(--radius);
  }

  .toc li ul {
    margin-inline-start: calc(var(--gap) * 0.5);
    list-style-type: none;
  }

  .toc li {
    list-style: none;
    font-size: 0.95rem;
    padding-bottom: 5px;
  }

  .toc li a:hover {
    color: var(--secondary);
  }
添加评论功能
看了不少评论“功能”,考虑再三,决定使用 Giscus
1.到 Github 新建 仓库,仓库名称根据自己的需求自己定,没有要求。下面3点需要注意:
2.登录 Giscus ,往下拉,在配置那个地方,输入你的 GitHub 仓库名称,复制生成的代码。
3.打开 hugo.yaml,设置 comments: true
4.在文件夹 layouts/partials/ 下新建一个名字叫 comments.html 的文件。然后 Giscus 生成的代码粘贴进去,保存
设置网站 icon
提示
这里的网站 icon 指的是浏览器 Tab 页中的小图标。
1.将图标放在 /static/img/
2.调整 hugo.yaml 文件
  assets:
    # disableHLJS: true # to disable highlight.js
    # disableFingerprinting: true
    favicon: "img/favicon.gif"
    favicon16x16: "img/favicon.gif"
    favicon32x32: "img/favicon.gif"
    apple_touch_icon: "img/favicon.gif"
    safari_pinned_tab: "img/favicon.gif"
菜单栏添加图标
在这里,我使用的是 FontAwesome 家的图标。
1.访问 FontAwesome
2.在 FontAwesome 首页,点击 [Start for Free] 按钮
3.输入自己的邮箱,点击 [Send Kit Embed Code] 按钮,然后根据提示进行注册
4.然后获取到一行 script 引入代码
5.将主题文件夹下(themes/paperMod/layouts/partials)的 extend_head.html 文件拷贝到 根目录下的 themes/paperMod/layouts/partials 文件夹,然后把 FontAwesome 提供的 script 贴进去
{{- /* Head custom content area start */ -}}
{{- /*     Insert any custom code (web-analytics, resources, etc.) - it will appear in the <head></head> section of every page. */ -}}
{{- /*     Can be overwritten by partial with the same name in the global layouts. */ -}}
{{- /* Head custom content area end */ -}}

<!-- 引入FontAwesome图标 -->
<script src="https://kit.fontawesome.com/xxxxxx.js" crossorigin="anonymous"></script>
6.修改 hugo.yaml 配置文件中的 menu.main ,参考:
menu:
      main:
        - identifier: search
          name: ' Search'
          url: /search/
          pre: '<i class="fa-solid fa-magnifying-glass"></i>'
          weight: 1
        - identifier: posts
          name: ' Posts'
          url: /posts/
          pre: '<i class="fa-solid fa-newspaper"></i>'
          weight: 2
在新标签打开菜单栏中的外链
最近在右上角的菜单栏里添加了 “开往” ,但是点开后却不是在新标签页打开,体验不是很好,所以要修改下。
将主题文件夹下(themes/paperMod/layouts/partials)的 header.html 文件拷贝到 根目录下的 themes/paperMod/layouts/partials 文件夹,添加 {{- if (hasPrefix .Identifier "ext-") }} 代码。
下面是 header.html 文件的代码片段。
<ul id="menu">
{{- range site.Menus.main }}
{{- $menu_item_url := (cond (strings.HasSuffix .URL "/") .URL (printf "%s/" .URL) ) | absLangURL }}
{{- $page_url:= $currentPage.Permalink | absLangURL }}
{{- $is_search := eq (site.GetPage .KeyName).Layout `search` }}
<li>
<a href="{{ .URL | absLangURL }}" {{- if (hasPrefix .Identifier "ext-") }} target="_blank" {{- end }} title="{{ .Title | default .Name }} {{- cond $is_search(Alt + /)" | safeHTMLAttr) ("" | safeHTMLAttr ) }}"
{{- cond $is_search (" accesskey=/" | safeHTMLAttr) ("" | safeHTMLAttr ) }}>
<span {{- if eq $menu_item_url $page_url }} class="active" {{- end }}>
{{- .Pre }}
{{- .Name -}}
{{ .Post -}}
</span>
{{- if (findRE "://" .URL) }}
<svg fill="none" shape-rendering="geometricPrecision" stroke="currentColor" stroke-linecap="round"
stroke-linejoin="round" stroke-width="2.5" viewBox="0 0 24 24" height="12" width="12">
<path d="M18 13v6a2 2 0 01-2 2H5a2 2 0 01-2-2V8a2 2 0 012-2h6"></path>
<path d="M15 3h6v6"></path>
<path d="M10 14L21 3"></path>
</svg>
{{- end }}
</a>
</li>
{{- end }}
</ul>
然后在 hugo.yaml 配置文件中调整对应菜单的 identifier 属性即可。
    menu:
      main:
        - identifier: search
          name: ' 搜索'
          url: /search/
          pre: '<i class="fa-solid fa-magnifying-glass"></i>'
          weight: 1
        - identifier: ext-travelling # “ ext- ” 开头的,会以新标签页的形式打开
          name: ' 开往'
          url: https://www.travellings.cn/go.html
          pre: '<i class="fa-solid fa-train-subway"></i>'
          weight: 9
添加版权信息
我另写了一篇博文来进行说明,请移步:PaperMod 主题 - 添加版权说明
添加不蒜子计数
静态网站建站现在有很多快速的技术和平台,但静态是优点也有缺点,由于是静态的,一些动态的内容如评论、计数等等模块就需要借助外来平台,评论有“多说”,计数有“不蒜”!(多说即将关闭,不蒜子还活着涅,这是程序员对程序员的承诺。)
1.为 hugo.yaml 文件添加参数
params:
  busuanzi:
    enable: true
2.底部添加 “站点访问量”:打开 layouts/partials/footer.html 文件,添加代码(放在 </footer> 标签上面即可):
<!-- Begin. 不蒜子计数 -->
{{ if .Site.Params.busuanzi.enable -}}
  <div class="busuanzi-footer">
    {{ if eq $lang "zh" }}
    <span id="busuanzi_container_site_pv">站点访问量:<span id="busuanzi_value_site_pv"></span></span>
    {{- else }}
    <span id="busuanzi_container_site_pv">Site Visits:<span id="busuanzi_value_site_pv"></span></span>
    {{- end -}}
  </div>
{{- end -}}
<!-- End. 不蒜子计数 -->
3.显示每篇文章阅读量:打开 layouts/_default/single.html 文件,添加代码(放在 <div class="post-meta"> 标签里即可):
<div class="post-meta">
{{- partial "post_meta.html" . -}}
{{- partial "translation_list.html" . -}}
{{- partial "edit_post.html" . -}}
{{- partial "post_canonical.html" . -}}
<!-- 【Begin】不蒜子 -->
{{- if .Site.Params.busuanzi.enable -}}
{{ $lang := .Site.Language.Lang }}
<div class="meta-item"> · 
{{ if eq $lang "zh" }}
<span id="busuanzi_container_page_pv">阅读量:<span id="busuanzi_value_page_pv"></span></span>
{{- else }}
<span id="busuanzi_container_page_pv">Readings: <span id="busuanzi_value_page_pv"></span></span>
{{- end }}
</div>
{{- end }}
<!-- 【End】不蒜子 -->
</div>
调整 Table 样式
在 layouts/_default/_markup 文件夹新添 render-table.html 文件
render-table.html
<table
  {{- range $k, $v := .Attributes }}
    {{- if $v }}
      {{- printf " %s=%q" $k $v | safeHTMLAttr }}
    {{- end }}
  {{- end }} class="custom_table_style">
  <thead>
    {{- range .THead }}
      <tr>
        {{- range . }}
          <th
            {{- with .Alignment }}
              {{- printf " style=%q" (printf "text-align: %s" .) | safeHTMLAttr }}
            {{- end -}}
          >
            {{- .Text -}}
          </th>
        {{- end }}
      </tr>
    {{- end }}
  </thead>
  <tbody>
    {{- range .TBody }}
      <tr>
        {{- range . }}
          <td
            {{- with .Alignment }}
              {{- printf " style=%q" (printf "text-align: %s" .) | safeHTMLAttr }}
            {{- end -}}
          >
            {{- .Text -}}
          </td>
        {{- end }}
      </tr>
    {{- end }}
  </tbody>
</table>

<style>
.post-content table:not(.lntable .highlighttable,.highlight table,.gist .highlight){
  display: table;
  background-color: transparent;
  border-radius: 6px;
  border: 1px solid black;
  outline: 2px solid black;
  overflow-x: auto;
  table-layout: fixed;
  word-break: break-all;
  font-size: 12px;
}

.dark .post-content table:not(.lntable .highlighttable,.highlight table,.gist .highlight){
  outline: 2px solid rgb(54, 156, 95);
}

.post-content table:not(.lntable .highlighttable,.highlight table,.gist .highlight) thead{
  background-color: #545d7b8a;
}

.dark .post-content table:not(.lntable .highlighttable,.highlight table,.gist .highlight) thead{
  background-color: rgb(62, 62, 62);
}

.post-content table:not(.lntable .highlighttable,.highlight table,.gist .highlight) td,
.post-content table:not(.lntable .highlighttable,.highlight table,.gist .highlight) tr,
.post-content table:not(.lntable .highlighttable,.highlight table,.gist .highlight) th{
  border-bottom: unset;
  border: 1px solid black,
}

.post-content table:not(.lntable .highlighttable,.highlight table,.gist .highlight) td:hover,
.post-content table:not(.lntable .highlighttable,.highlight table,.gist .highlight) td:focus{
  background-color: rgba(67, 166, 86, 0.8);
}

.dark .post-content table:not(.lntable .highlighttable,.highlight table,.gist .highlight) td:hover,
.dark .post-content table:not(.lntable .highlighttable,.highlight table,.gist .highlight) td:focus{
  background-color: rgb(0, 0, 0, 0.7);
}
</style>
如何写文章
基本知识
什么是 FrontMatter
archetypes下的default.md文件是什么,如何使用?
在 Hugo 中,archetypes 目录包含模板文件,通常命名为 default.md,用于定义新创建内容的默认前置数据(Front Matter)。当您使用 Hugo 创建新文章或页面时,这些模板会自动填充到新文件中,从而为您提供一个基本的结构。
预设字段: 该文件可以包含常用的前置数据字段,例如
title、date、tags、categories等,您可以在创建新内容时直接使用这些字段,而不必每次手动输入。统一格式: 通过使用模板,您可以确保所有新创建的内容都遵循相同的格式和结构。
常用的 FrontMatter
下面是我常用的 Front Matter
Front-Matter
---
title: '{{ replace .File.ContentBaseName "-" " " | title }}' # 当前文章标题
description: ''  # 当前文章副标题
date: '{{ .Date }}' # 创建日期
author: "Rickey" # 作者
slug: '' # 文章Url
showToc: true # 显示目录
TocOpen: true # 自动展开目录
enableCopyright: true # 显示版权信息
comments: true # 显示评论
weight: null # 若置顶则为对应数字
draft: false # 是否为草稿
# 分类
Categories:
  - Example

# 标签
Tags:
  - Example

# 关键字
keywords:
    - keywords1
    - keywords2
    - keywords3

cover:
  # 图片的替代文本,用于无障碍访问和在图片无法加载时显示的文本
  alt: ''
  # 图片的说明文字,通常用于描述图片内容
  caption: ''
  # 封面图片的路径,可以是相对路径或绝对 URL,用于指定实际的封面图像
  image: ''
  # 指示 image 路径是否为相对路径。如果为 true,则认为路径是相对于当前内容文件的;如果为 false,则认为是绝对路径
  relative: false
---