Introduction
This article discusses how to connect to D365 using the ClientSecret authorization method in a console application (.NET Framework).
The Microsoft.Xrm.Tooling.Connector provides various authorization methods, but based on my project experience, the two most commonly used are Office365 and ClientSecret.
List of Authorization Methods:
| # | Name | Value | Description |
|---|---|---|---|
| 1 | InvalidConnection | -1 | Invalid connection |
| 2 | AD | 0 | Active Directory Auth |
| 3 | Live | 1 | Live Auth |
| 4 | IFD | 2 | SPLA Auth |
| 5 | Claims | 3 | CLAIMS based Auth |
| 6 | Office365 | 4 | Office365 base login process |
| 7 | OAuth | 5 | OAuth based Auth |
| 8 | Certificate | 6 | Certificate based Auth |
| 9 | ClientSecret | 7 | Client Id + Secret Auth type |
| 10 | ExternalTokenManagement | 99 | Host manages Auth token for CRM connections |
Detailed Steps
Prerequisites: You must be an “Administrator” user to access the Azure Active Directory portal.
1. Obtain ClientId and ClientSecret
Step 1: Register an Application
(1) Visit and log in to the Azure Portal.
- International version: Azure Portal
- China region version: Azure Portal
(2) In the top search box, search for “App registrations” and click on it.

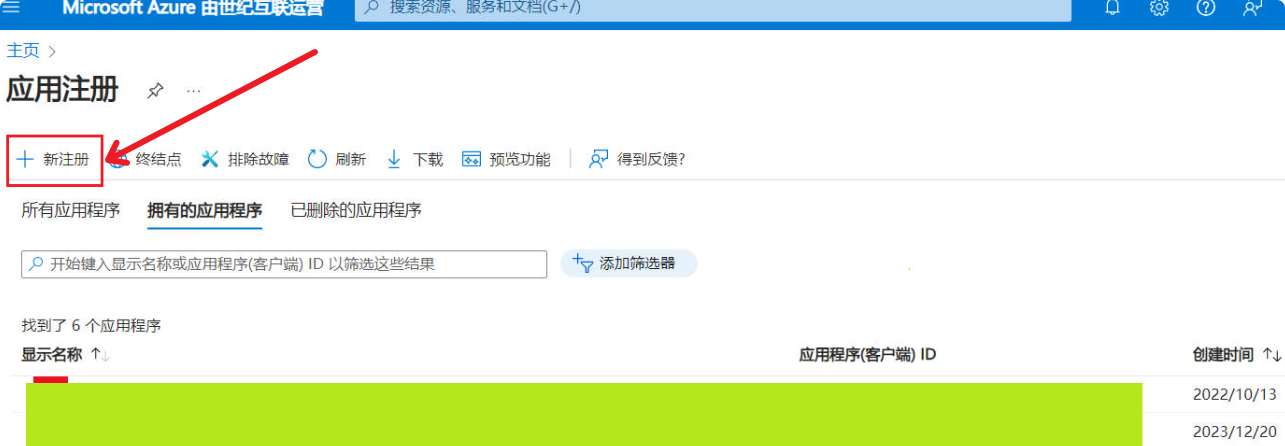
(3) Click “New registration.”
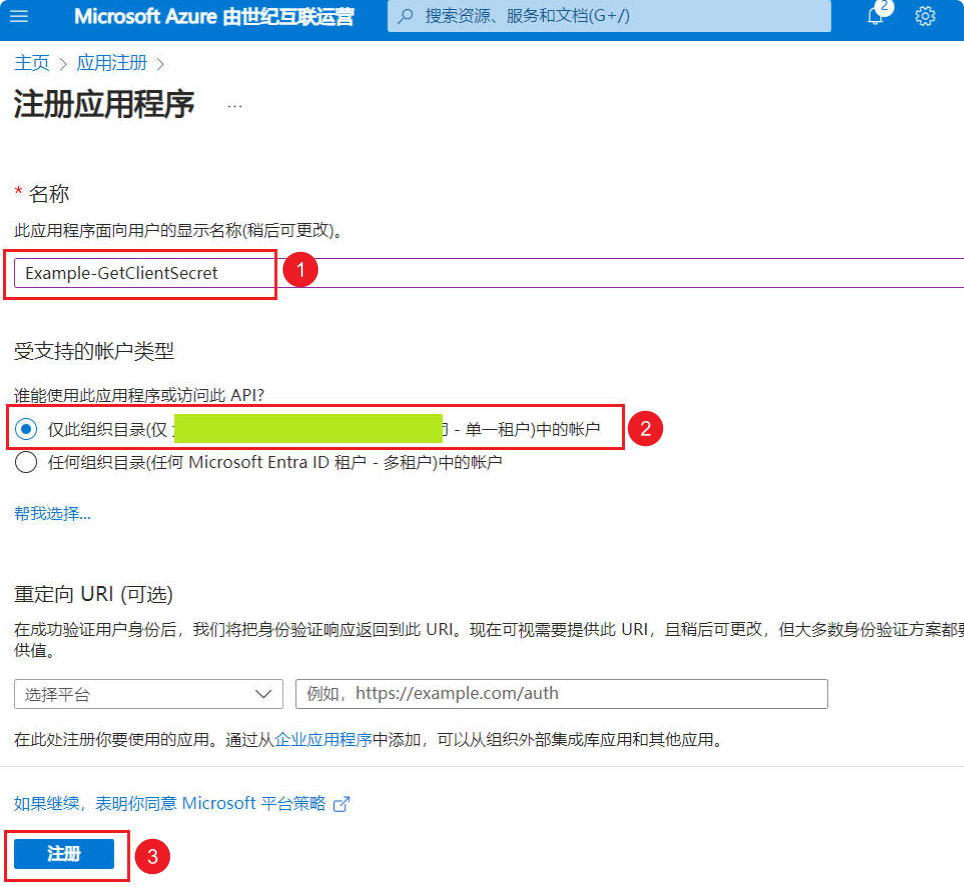
(4) In the pop-up window, enter a meaningful application name (e.g., D365-GetClientSecret) –> Check the supported account types –> Click the “Register” button.
Step 2: Get ClientId
ClientSecret is a password-like key that effectively prevents unauthorized access. Compared to using a username and password, ClientSecret provides a more secure authentication method and reduces the risk of data breaches.
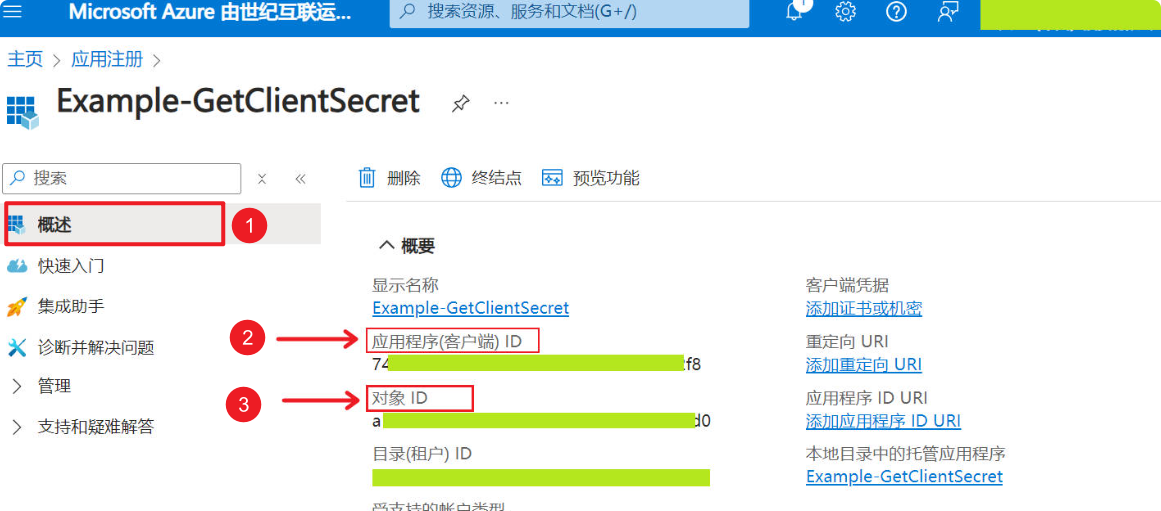
After completing Step 1, you can find the Application ID (ClientId) in the “Overview” section. Copy it to a text file, as you will need it later.
Step 3: Get ClientSecret
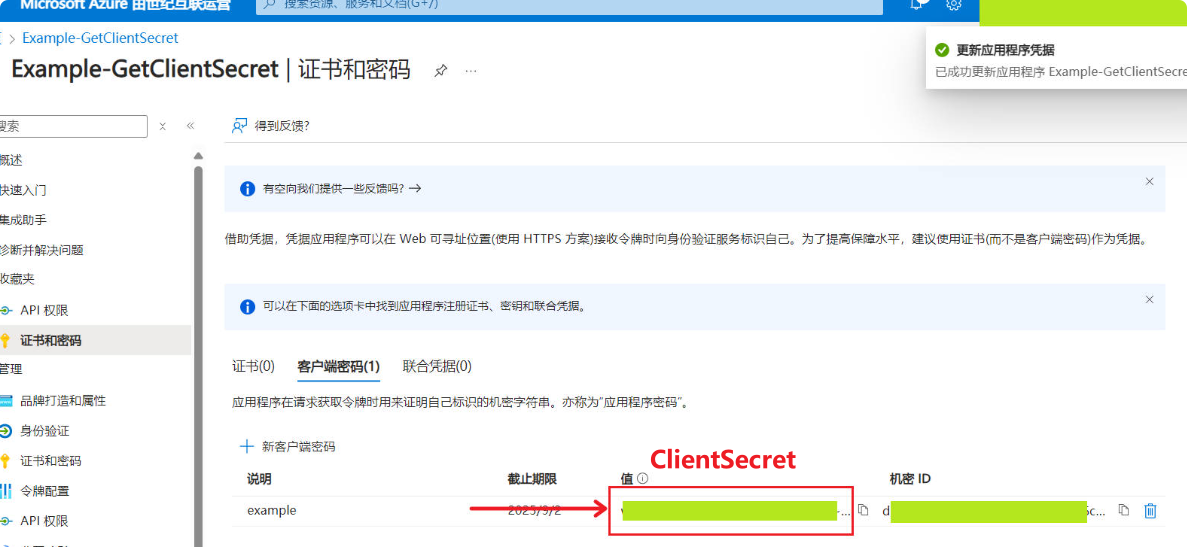
Select “Certificates & secrets” in the menu bar –> Client secrets –> “+ New client secret” –> Fill in a meaningful description in the pop-up window –> Check the expiration date –> Click the “Add” button.
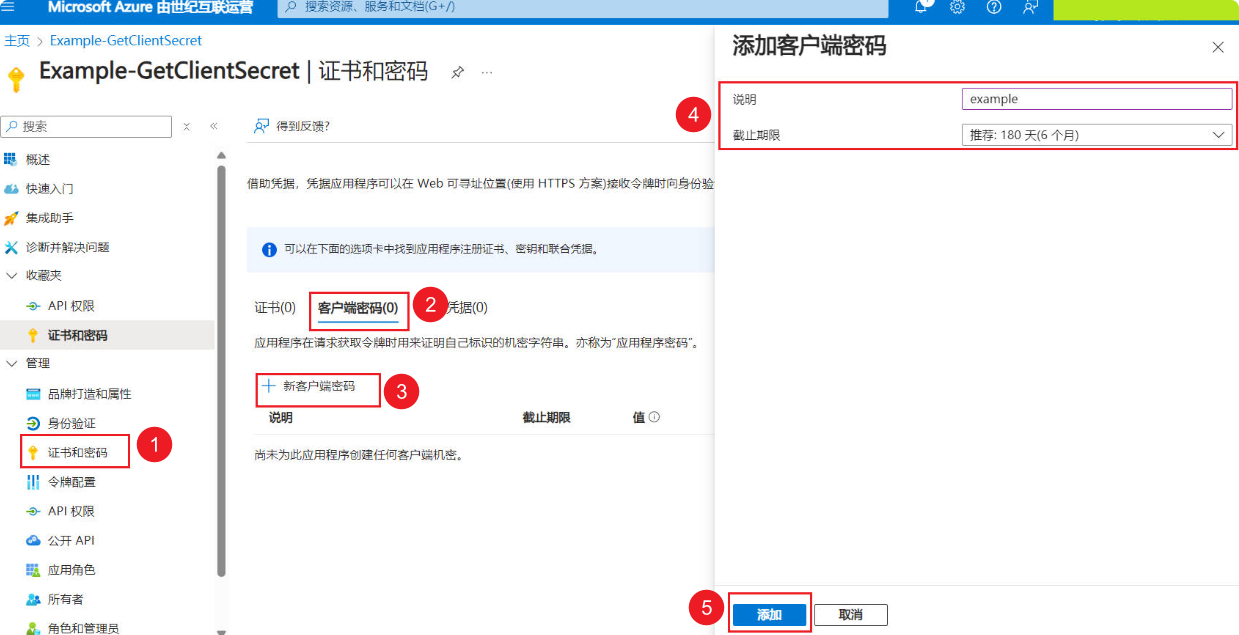
After adding the “Client secret,” it will appear in the list. Copy it to a text file, as you will need it later (the “Value (ClientSecret)” will be encrypted after the page refreshes; if you do not copy it in time, you can delete it and recreate it).
2. Add Application User
(1) Log in to the “Power Platform Admin Center” –> Select the environment –> Click “Settings.”
(2) Select “Application users” in the menu.
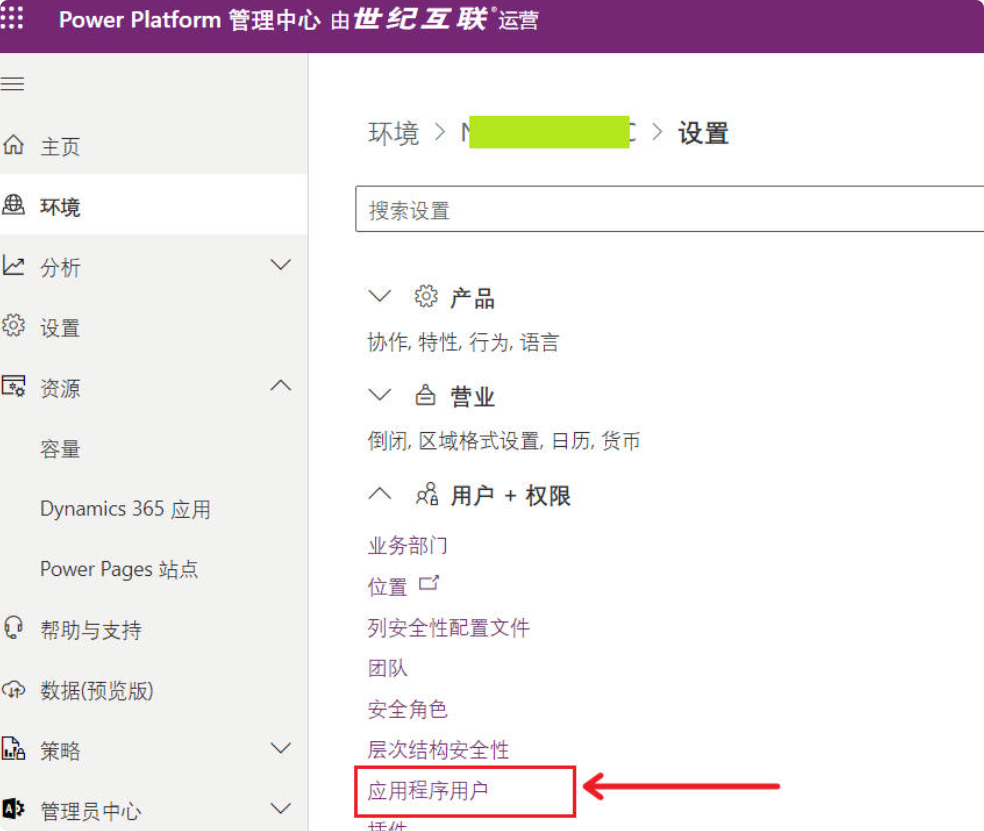
In the top menu bar, choose “+ Add a new application user” –> Select “App” (the app you created in Step 1) –> Select the business unit (it is recommended to select “Root business unit”) –> Choose the security role “System Administrator” –> Click the “Create” button.
3. Create Console Application for Testing
Step 1: Create a New Project
-
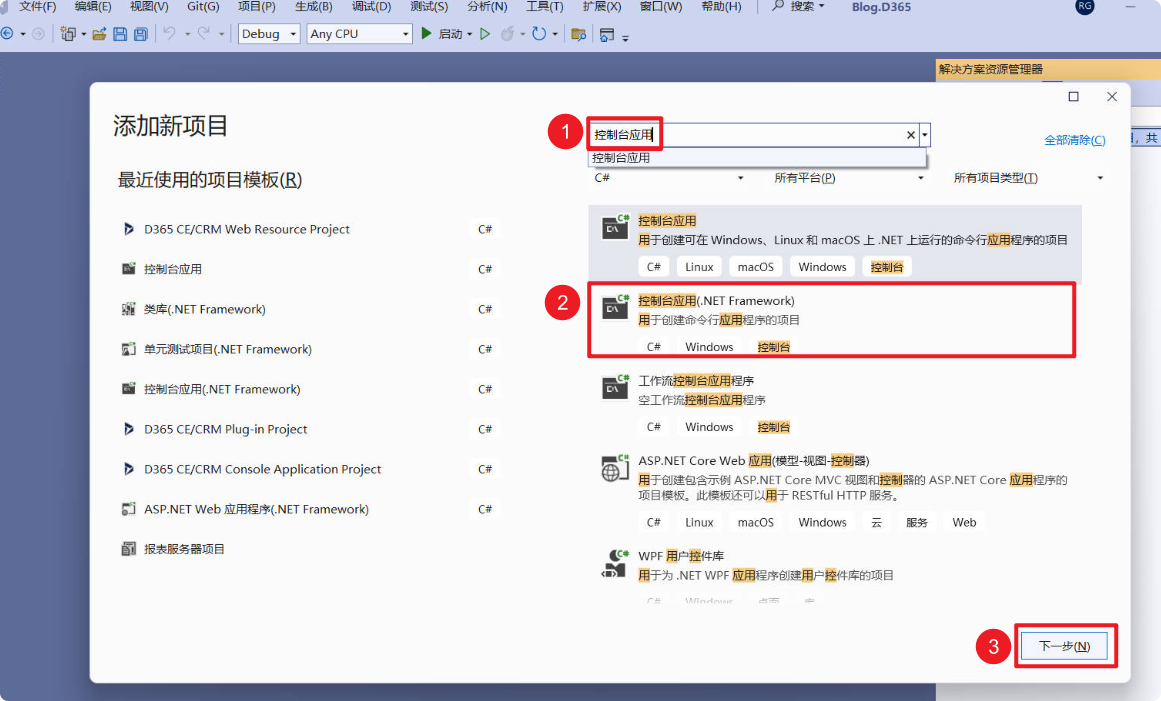
Open Visual Studio and create a new Console Application (.NET Framework) project.
-
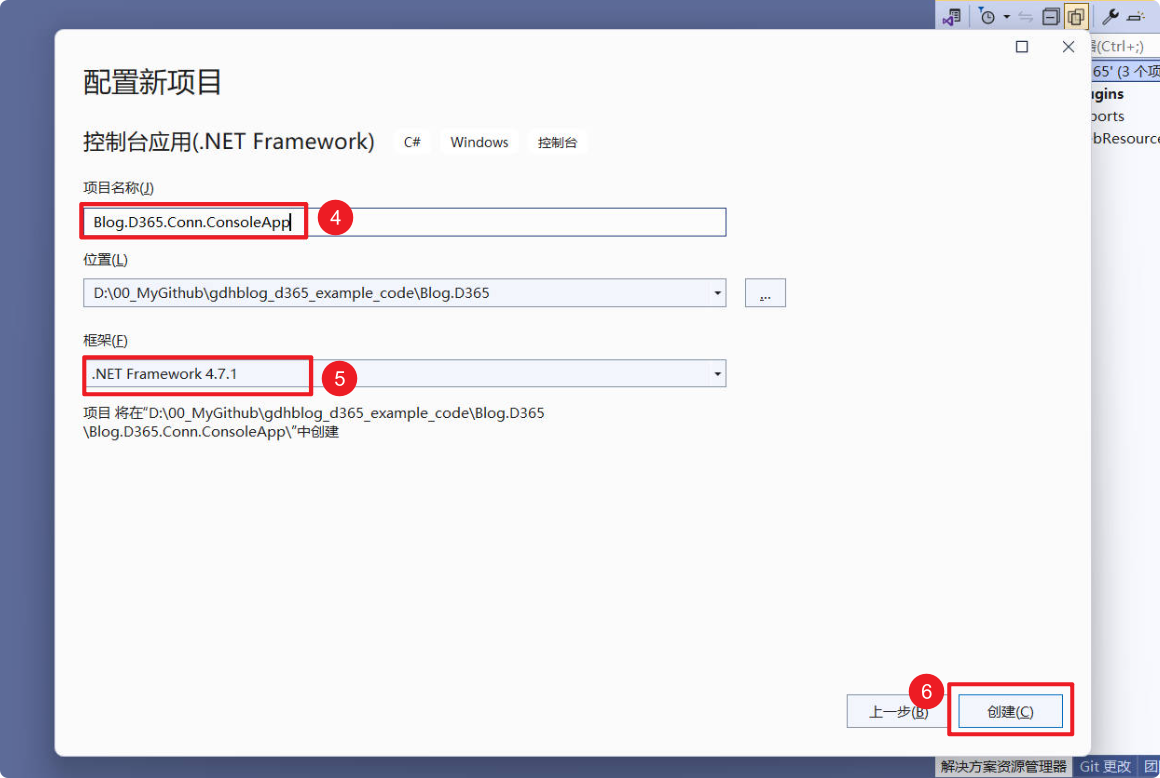
Enter a meaningful project name –> Select the framework –> Click “Create.”
Step 2: Add Dependencies to the Project
Microsoft.CrmSdk.CoreAssembliesSystem.Configuration.ConfigurationManager
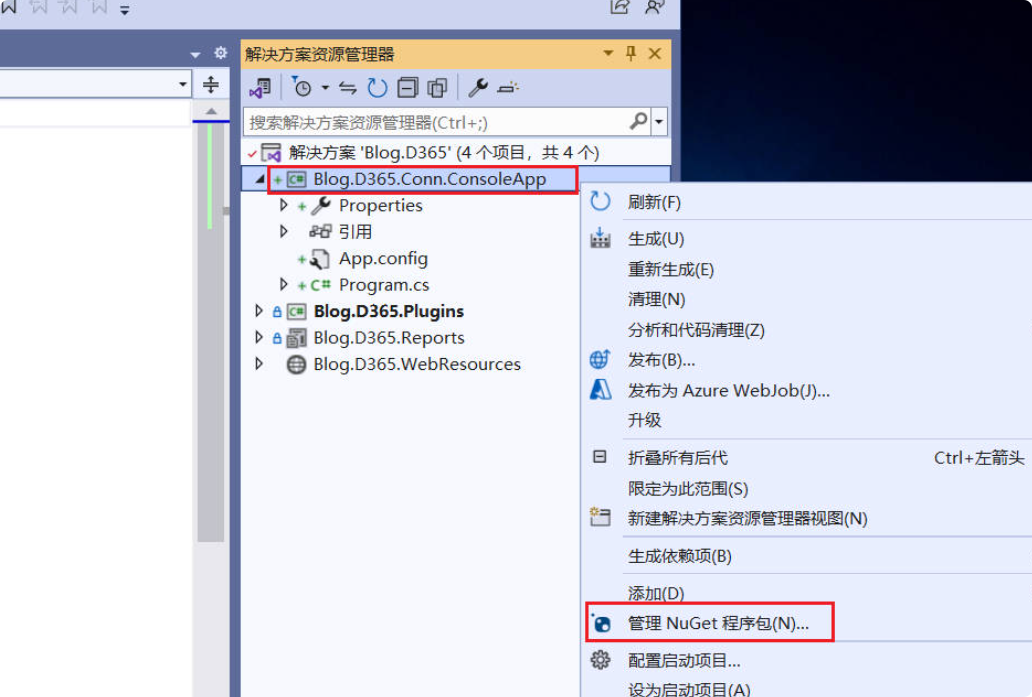
Right-click your project –> Manage NuGet Packages.
In the new window, select the “Browse” tab and search for Microsoft.CrmSdk.CoreAssemblies.
Select Microsoft.CrmSdk.CoreAssemblies from the results and click the Install button on the right. Click “Accept” in the pop-up window.
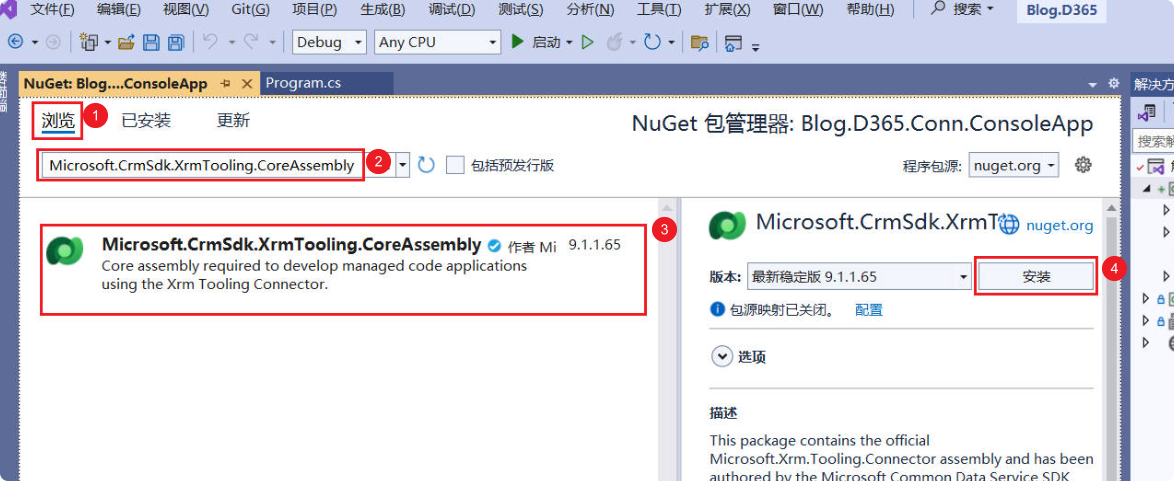
Now the Microsoft.CrmSdk.CoreAssemblies dependency is installed. Please repeat the same steps to install the System.Configuration.ConfigurationManager dependency.
Step 3: Add Connection Information to App.config
In App.config, add connection information (connectionStrings) and replace the following information with your details:
- urlofyourdynamics365instance, your environment access URL
https://xxx.crm.dynamics.cn/ - yourClientId, the ClientId obtained from the previous steps
- yourClientSecret, the ClientSecret obtained from the previous steps
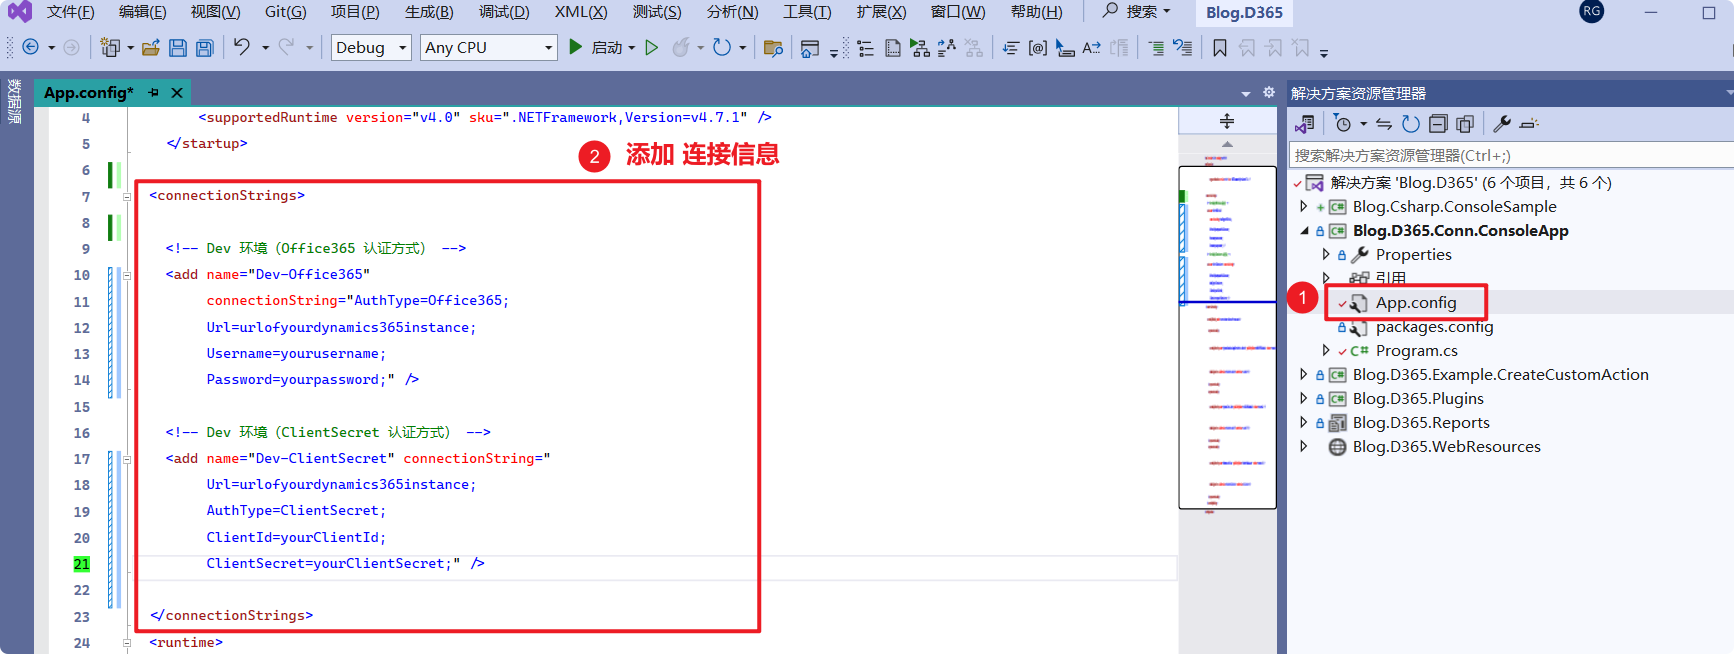
<connectionStrings>
  <!-- Dev environment (ClientSecret authentication method) -->
  <add name="Dev-ClientSecret" connectionString="
     Url=urlofyourdynamics365instance;
     AuthType=ClientSecret;
     ClientId=yourClientId;
     ClientSecret=yourClientSecret;" />
</connectionStrings>Step 4: Add Test Code
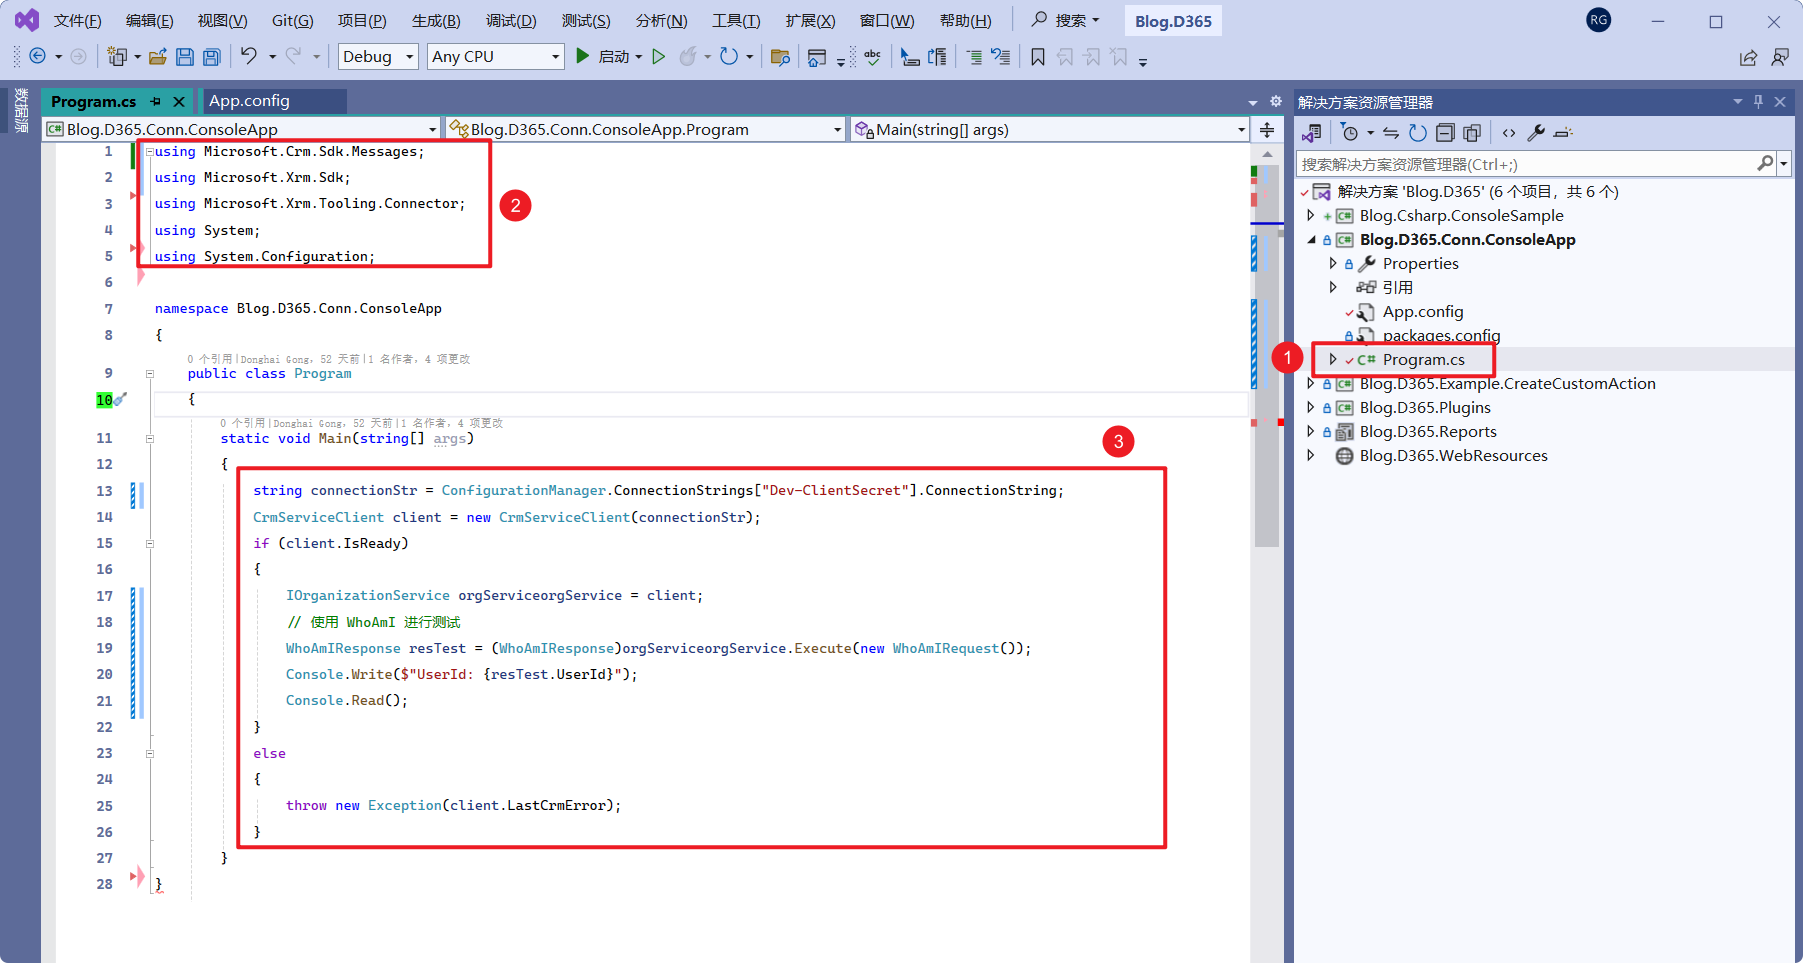
(1) Open Program.cs.
(2) Replace the using directives at the top with the following:
using Microsoft.Crm.Sdk.Messages;
using Microsoft.Xrm.Sdk;
using Microsoft.Xrm.Tooling.Connector;
using System;
using System.Configuration;(3) In the Main method, add the following code:
string connectionStr = ConfigurationManager.ConnectionStrings["Dev-ClientSecret"].ConnectionString;
CrmServiceClient client = new CrmServiceClient(connectionStr);
if (client.IsReady)
{
    IOrganizationService orgService = client;
    // Test using WhoAmI
    WhoAmIResponse resTest = (WhoAmIResponse)orgService.Execute(new WhoAmIRequest());
    Console.Write($"UserId: {resTest.UserId}");
    Console.Read();
}
else
{
    throw new Exception(client.LastCrmError);
}Step 5: Test
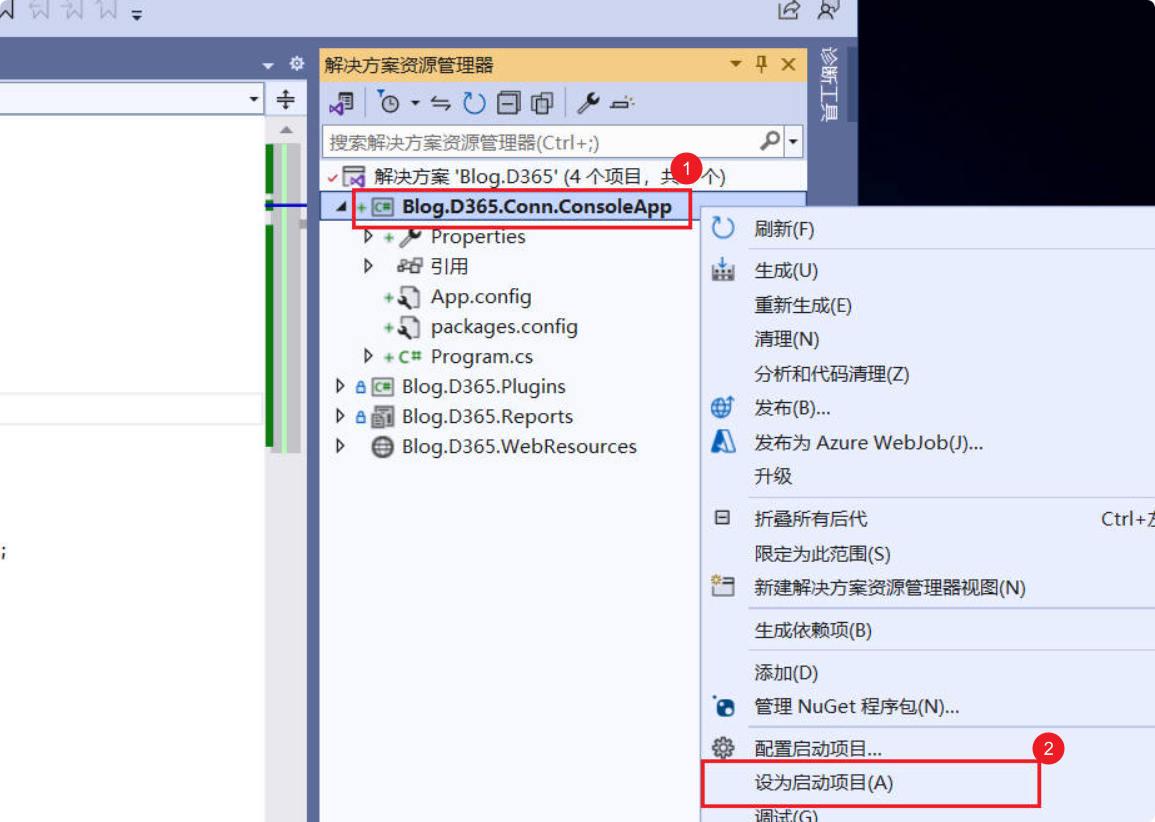
(1) Right-click your project –> Set as Startup Project.
(2) Use F5 or click the Start button at the top to run the program.
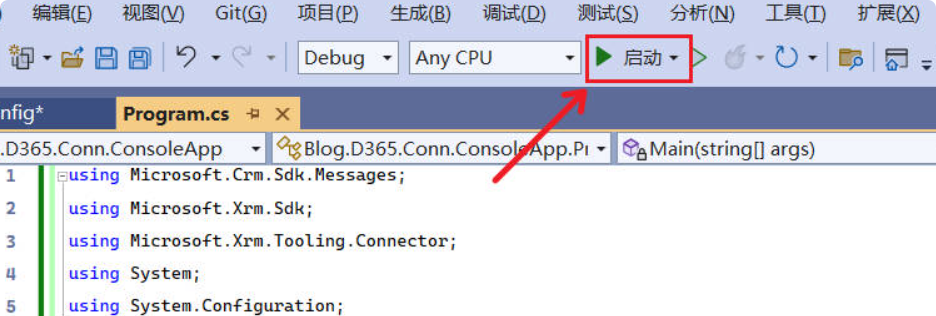
If everything is working correctly, it will print the UserId, and you can then try using IOrganizationService for CRUD operations.


Comments