Foreword
Environment Information
- Operating System: Windows
- Hugo: v0.141.0
- PaperMod: 8.0
Deployment Environment and Method
Linux server + Baota panel
General Steps
The general steps can be divided into the following:
- Environment preparation
- Creating a Github repository (for backup)
- Building the blog
- Blog configuration
Preparing the Basic Environment
Before building the blog, you need to prepare the basic environment, which requires downloading and installing:
- Hugo
- Git
- Node.js
Install Hugo
Refer to the download documentation and links provided by the Hugo official website. Note that you need to install the extendedversion of Hugo.
https://gohugo.io/installation/
Install Git
Refer to the download documentation and links provided by the Git official website.
https://git-scm.com/book/en/v2/Getting-Started-Installing-Git
Install Node.js
The official download link for Node.js is as follows. Download the LTS (Long-Term Support) version.
Tip
LTS stands for Long-Term Support, which means it is a stable and well-supported version.
Creating a Repository on Github
Open your own Github account, and after creating a repository on Github, clone the repository to your local machine. My repository name is: Blog
Tip
If you don’t use Github regularly, you can also use other code hosting platforms, or even skip this step. I use it to back up my blog posts and configuration files.
Building the Blog
Downloading the PaperMod Theme
The download link for the PaperMod theme package is as follows. After downloading, you can put it on your desktop or any other folder, as long as you can find it when you need it.
https://github.com/adityatelange/hugo-PaperMod/wiki/Installation
Creating a Blog with Hugo
If you skipped the “Creating a Repository on Github” step, you can directly create a Blog folder on your desktop.
- Open the terminal as an administrator, navigate to the Blog folder, and run the following code:
hugo new site Gdh-PaperMod-Blog
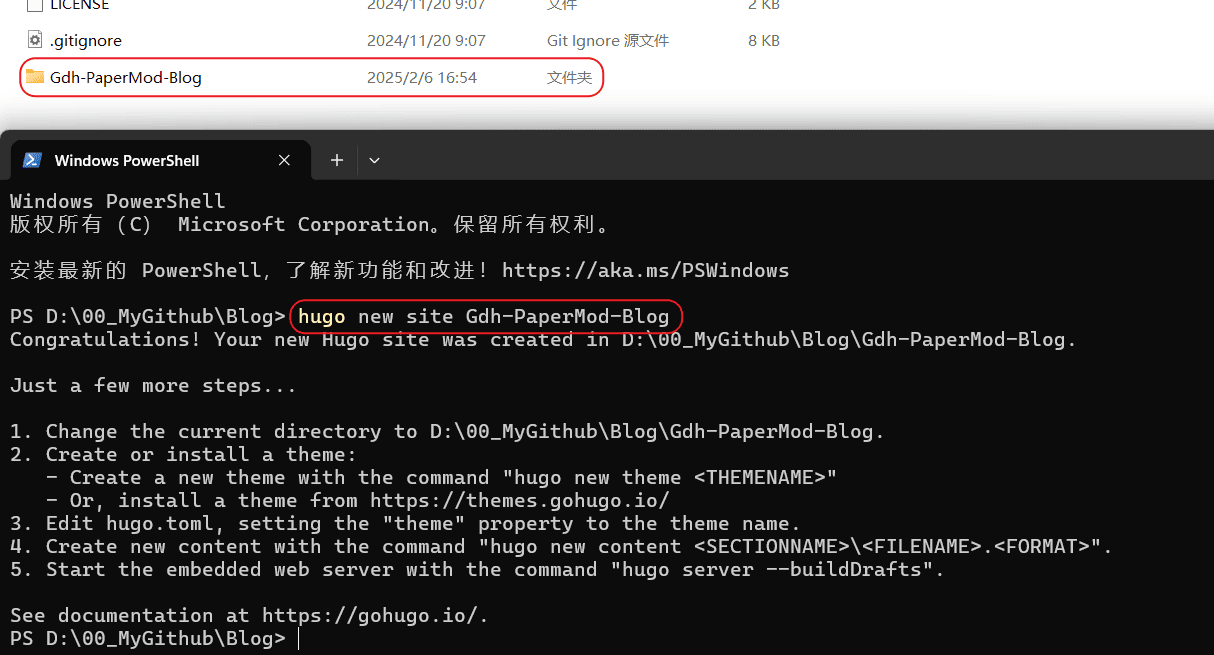
The Gdh-PaperMod-Blog folder is structured as follows:
D:\00MyGithub\Blog\Gdh-PaperMod-Blog
│  hugo.toml # Configuration file for the blog website (blog name, copyright information, etc.)
│
├─archetypes
│      default.md # Template for the header of new articles
│
├─assets
├─content # Directory containing the various pages read by the blog, including the home page (home, about, archives, etc.) and articles
├─data
├─i18n
├─layouts # Layout files for the blog website
├─static # Static content
└─themes # Where the blog theme is stored, which is the focus of our next explanation
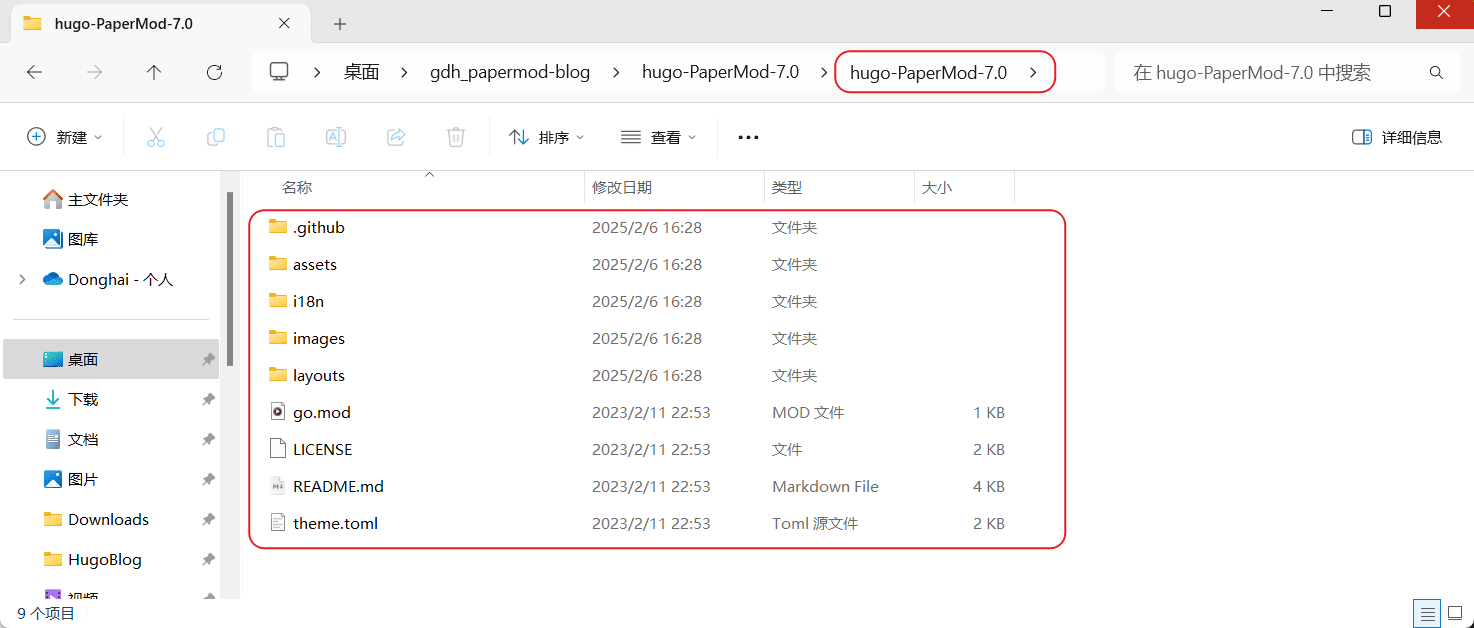
Adding the Theme
Add the PaperMod theme to the themes folder. Unzip the PaperMod theme package you downloaded earlier, then copy the contents (not the outer folder) to the themes folder. Make sure you copy the contents, not the outer folder directly.
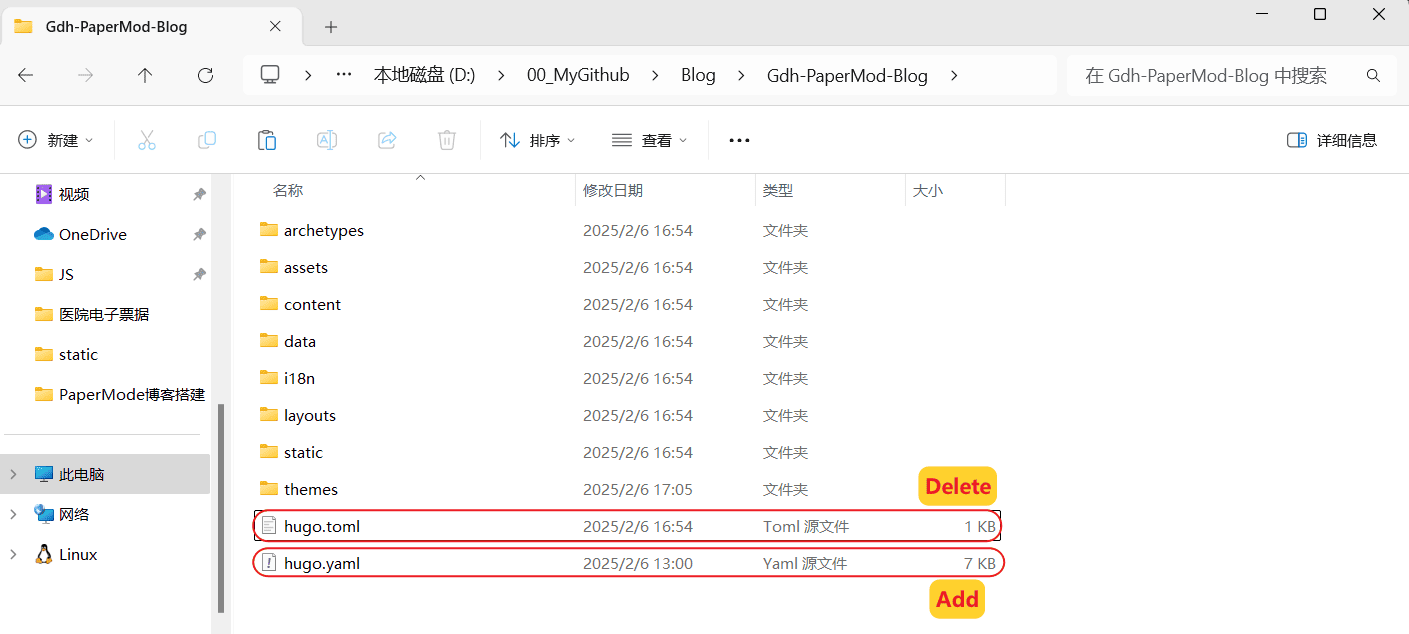
Configuring the Blog Simply
Delete the hugo.toml file in the directory, then create a new hugo.yaml file.
Open the hugo.yaml file and copy and paste the following content into it, then save it.
Open the hugo.yaml file and copy and paste the following content into it, then save it:
baseURL: "https://gdhblog.com/" # Blog domain name
paginate: 10 # Number of articles to display per page on the home page
theme: hugo-PaperMod-8.0 # Name of the PaperMod theme folder in the themes directory
title: My Blog
At this point, we have set up a simple blog. Let’s try to get it running.
- Open the terminal as an administrator, navigate to the
Gdh-PaperMod-Blogfolder, and run the following command:
hugo server
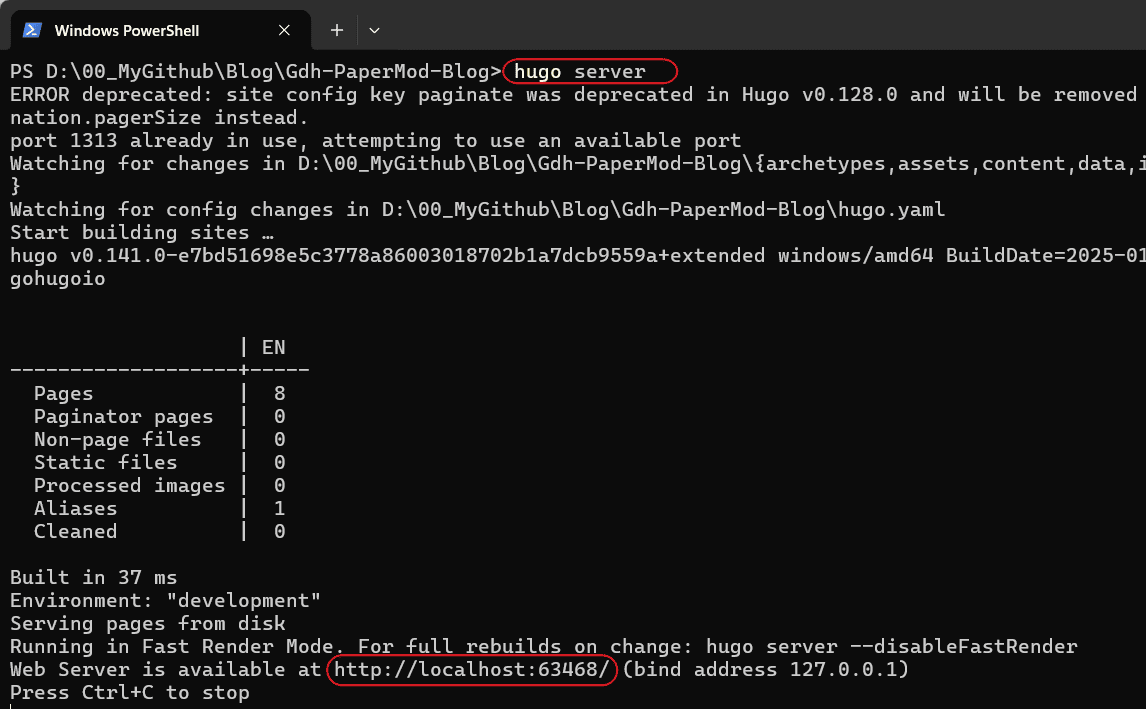
It’s running locally now.

Blog Customization
We can see that the blog is currently mostly blank, except for the title in the top left corner. Now we need to configure the hugo.yaml file to meet the requirements of our own blog.
Basic Requirements
When building our own blog, we need to first clarify our own requirements, so that the process will be clearer and more organized. Here are the basic functions I think a blog should have:
- Menu
| No. | Menu(Zh) | Menu(En) |
|---|---|---|
| 1 | 搜索 | Search |
| 2 | 文章 | Post |
| 3 | 分类 | Categories |
| 4 | 归档 | Archives |
| 5 | 标签 | Tags |
| 6 | 关于 | About |
| 7 | 友情链接 | Links |
| 8 | RSS | RSS |
Support for multiple languages (Chinese and English)
Comments
Configuring hugo.yaml
Here is my hugo.yaml configuration file for your reference. If this is your first time building a blog, you can directly copy this and then modify it according to your own requirements. Most of the parameters have comments explaining their purpose.
hugo.yaml
baseURL: "https://gdhblog.com/" # Blog domain name
paginate: 10 # Number of articles to display per page on the home page
theme: hugo-PaperMod-8.0 # Name of the PaperMod theme folder in the themes directory
title: My Blog

enableRobotsTXT: true # Allows search engines to crawl and index the site, recommended to set as true.
hasCJKLanguage: true # Automatically detects if the content includes Chinese, Japanese or Korean languages. This can be enabled if the articles use a lot of Chinese punctuation marks.
buildDrafts: false # This option controls whether to include content marked as drafts when building the site.
buildFuture: false # This option controls whether to include content with future publish dates when building the site.
buildExpired: false # his option controls whether to include expired content when building the site. Setting it to false ensures that only the latest and most relevant content is displayed on the live site.
minify:
  disableXML: true # This will disable the generation of the XML sitemap. If you don't need the XML sitemap, this can reduce build time.
  minifyOutput: true # true This will compress the HTML, CSS, and JavaScript files, reducing the file size of the pages and improving page load speed.

params:
  env: production # to enable google analytics, opengraph, twitter-cards and schema.
  keywords: [
      keywords1,
      keywords2,
      keywords3,
    ] # Homepage Keywords
  displayFullLangName: true
  label: # 左上角图标
    icon: "img/favicon.gif" # Image Paths: /static/img
    iconHeight: 35

  images: ["<link or path of image for opengraph, twitter-cards>"]
  DateFormat: "2006-01-02" # 将时间格式修改为国内常用格式
  defaultTheme: auto # dark, light
  disableThemeToggle: false
  ShowReadingTime: true # 阅读文章时间
  ShowShareButtons: false # 文章底部的分享按钮
  ShowPostNavLinks: true
  ShowBreadCrumbs: true # 显示面包屑导航
  ShowCodeCopyButtons: true
  ShowWordCount: true
  ShowRssButtonInSectionTermList: true
  UseHugoToc: true
  disableSpecial1stPost: false
  disableScrollToTop: false
  comments: true # 文章评论
  hidemeta: false
  hideSummary: true # 隐藏文章摘要
  showtoc: true # 显示文章目录
  tocopen: true # 默认打开文章目录

  assets:
    # disableHLJS: true # to disable highlight.js
    # disableFingerprinting: true
    favicon: "img/favicon.gif" # 图片路径:/static/img
    favicon16x16: "img/favicon.gif"
    favicon32x32: "img/favicon.gif"
    apple_touch_icon: "img/favicon.gif"
    safari_pinned_tab: "img/favicon.gif"

  cover:
    hidden: true # hide everywhere but not in structured data
    hiddenInList: true # hide on list pages and home
    hiddenInSingle: true # hide on single page

  # for search
  # https://fusejs.io/api/options.html
  fuseOpts:
    isCaseSensitive: false
    shouldSort: true
    location: 0
    distance: 1000
    threshold: 0.4
    minMatchCharLength: 0
    limit: 10 # refer: https://www.fusejs.io/api/methods.html#search
    keys: ["title", "permalink", "summary", "content"]

# Read: https://github.com/adityatelange/hugo-PaperMod/wiki/FAQs#using-hugos-syntax-highlighter-chroma
pygmentsUseClasses: true
markup:
  highlight:
    # noClasses: false
    anchorLineNos: true
    codeFences: true
    guessSyntax: true # Guessed Syntax Highlighting: It's recommended to set this feature to 'true'. If you don't specify the languages to display, it will automatically match the syntax.
    lineNos: true # This option allows you to choose whether to display line numbers for the code snippets.
    style: monokai

# Multilingual Configuration
defaultContentLanguage: en # Default Language
defaultContentLanguageInSubdir: false # If you want your default language content to use a subdirectory (e.g. '/en/'), you can configure that in the multilingual settings.
languages:
  en:
    title: Rickey's blog
    description: "I sincerely document this because life is worth it."
    weight: 2
    languageCode: en-us
    languageName: "English"
    params:
      author: Rickey
      social: true
      profileMode:
        enabled: true
        title: "Rickey Gong"
        subtitle: "I sincerely document this because life is worth it."
        imageUrl: "avatar.png" # path: /static
        imageWidth: 120
        imageHeight: 120
        imageTitle: "Welcome to Rickey's blog"
        buttons:
          - name: Posts
            url: posts
          - name: Archives
            url: archives
          - name: Links
            url: friends
          - name: Please have a coffee
            url: donate
      # Social platform small icon, reference:https://adityatelange.github.io/hugo-PaperMod/posts/papermod/papermod-icons/
      socialIcons:
        - name: github
          url: "https://github.com/rickeygong/"
        - name: email
          url: "mailto:donghai.gong@outlook.com"
        - name: rss
          url: /index.xml/
        - name: bilibili
          url: "https://space.bilibili.com/14020906"
        - name: linkedin
          url: "https://linkedin.com/in/donghai-gong-11a74b225"
    menu:
      main:
        - identifier: search
          name: Search
          url: /search/
          weight: 1 # The "weight" parameter represents the order of the right-upper menu buttons, from 1 to 8, from left to right.
        - identifier: posts
          name: Posts
          url: /posts/
          weight: 2
        - identifier: categories
          name: Categories
          url: /categories/
          weight: 3
        - identifier: archives
          name: Archives
          url: /archives/
          weight: 4
        - identifier: tags
          name: Tags
          url: /tags/
          weight: 5
        - identifier: about
          name: About
          url: /about/
          weight: 6
        - identifier: friends
          name: Links
          url: /friends/
          weight: 7
        - identifier: rss
          name: RSS
          url: index.xml
          weight: 8

  zh:
    title: 龚东海的博客
    description: "我真诚地记录着,因为生活值得"
    weight: 1
    languageCode: zh-cn
    languageName: "简体中文"
    params:
      author: 龚东海
      social: true
      profileMode:
        enabled: true
        title: "龚东海"
        subtitle: "我真诚地记录着,因为生活值得。"
        imageUrl: "avatar.png"
        imageWidth: 120
        imageHeight: 120
        imageTitle: "欢迎来到龚东海的博客"
        buttons:
          - name: 文章
            url: posts
          - name: 归档
            url: archives
          - name: 友链
            url: friends
          - name: 请喝咖啡
            url: donate
      socialIcons:
        - name: github
          url: "https://github.com/rickeygong/"
        - name: email
          url: "mailto:donghai.gong@outlook.com"
        - name: rss
          url: /index.xml/
        - name: bilibili
          url: "https://space.bilibili.com/14020906"
        - name: linkedin
          url: "https://linkedin.com/in/donghai-gong-11a74b225"
    menu:
      main:
        - identifier: search
          name: 搜索
          url: /search/
          weight: 1
        - identifier: posts
          name: 文章
          url: /posts/
          weight: 2
        - identifier: categories
          name: 分类
          url: /categories/
          weight: 3
        - identifier: archives
          name: 归档
          url: /archives/
          weight: 4
        - identifier: tags
          name: 标签
          url: /tags/
          weight: 5
        - identifier: about
          name: 关于
          url: /about/
          weight: 6
        - identifier: friends
          name: 友情链接
          url: /friends/
          weight: 7
        - identifier: rss
          name: RSS
          url: index.xml
          weight: 8

# ----- [Begin]. Search config -----
outputs:
  home:
    - HTML
    - RSS
    - JSON
# ----- [End]. Search config -----
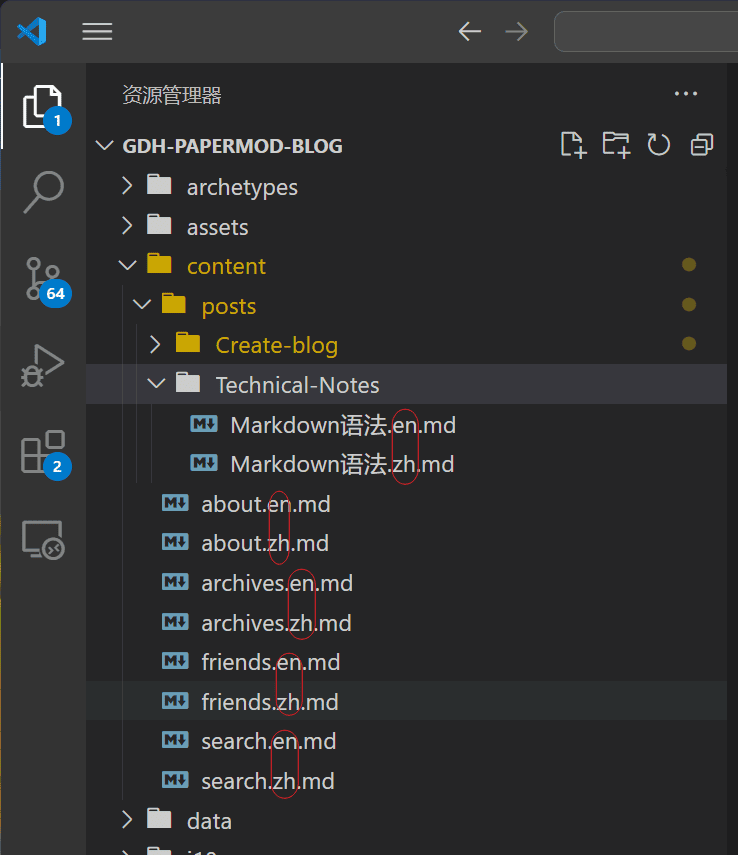
multilanguage
There are several ways to manage Hugo’s multilingual content. If you are interested, you can refer to the Huho documentation Multilingual Mode section.
Here I use “translate with filename” , for example:
- filename.zh.md
- filename.en.md
Add Page
Search page
- add the files
search.en.mdandsearch.zh.mdto thecontentfolder. - Add the search configuration information to the
hugo.yamlfile
search.en.md
---
title: "Search" # in any language you want
layout: "search" # necessary for search
summary: "search"
placeholder: "placeholder text in search input box"
---
search.zh.md
---
title: "Search" # in any language you want
layout: "search" # necessary for search
summary: "search"
placeholder: ""
---
hugo.yaml File Add Search Configuration Information
outputs:
  home:
    - HTML
    - RSS
    - JSON
Archives page
Add the archives.en.md and archives.zh.md files to the content folder.
archives.en.md
---
title: "Archive"
layout: "archives"
url: "/archives/"
summary: archives
---
archives.zh.md
---
title: "归档"
layout: "archives"
summary: archives
---
Links page
- add
friends.htmlfile underlayouts/shortcodes/folder (if there is noshortcodesfolder, just create a new one) - Add
friends.en.mdandfriends.zh.mdfiles undercontentfolder.
Add friends.en.md and friends.zh.md files under content folder with the following code.
friends.html
<style>
    .friendurl {
        text-decoration: none !important;
        color: var(--primary) !important;
        box-shadow: none !important;
    }

    .myfriend {
        width: 56px !important;
        height: 56px !important;
        border-radius: 50% !important;
        padding: 2px;
        margin-top: 20px !important;
        margin-left: 14px !important;
        background-color: #fff;
    }

    .frienddiv {
        overflow: auto;
        height: 100px;
        width: 49%;
        display: inline-block !important;
        border-radius: 5px;
        background: none;

        -webkit-transition: box-shadow 0.4s ease, transform 0.4s ease;
        -moz-transition: box-shadow 0.4s ease, transform 0.4s ease;
        -o-transition: box-shadow 0.4s ease, transform 0.4s ease;

        transition: box-shadow 0.4s ease, transform 0.4s ease;
    }

    .frienddiv:hover {
        background: var(--code-bg);
        transition: box-shadow 1s ease, transform 1s ease;
    }

    .dark .frienddiv:hover {
        background: var(--code-bg);
        transition: box-shadow 1s ease, transform 1s ease;
    }

    .frienddiv:hover .frienddivleft img {
        transition: 0.9s !important;
        transform: rotate(360deg) !important;
    }

    .frienddivleft {
        width: 92px;
        float: left;
        margin-right: -5px;
    }

    .frienddivright {
        margin-top: 18px;
        margin-right: 18px;
    }

    .friendname {
        text-overflow: ellipsis;
        font-size: 100%;
        margin-bottom: 5px;
        color: var(--primary);
    }

    .friendinfo {
        text-overflow: ellipsis;
        font-size: 70%;
        color: var(--primary);
    }

    @media screen and (max-width: 600px) {
        .friendinfo {
            display: none;
        }

        .frienddivleft {
            width: 84px;
            margin: auto;
        }

        .frienddivright {
            height: 100%;
            margin: auto;
            display: flex;
            align-items: center;
            justify-content: center;
        }

        .friendname {
            font-size: 18px;
        }
    }

    .site-friend-link-image {
        border-radius: 50% !important;
    }

    .site-friend:hover img {
        transition: 0.9s !important;
        transform: rotate(360deg) !important;
    }
</style>

{{- if .IsNamedParams -}}
<a target="_blank" href={{ .Get "url" }} title={{if .Get "title" }} {{.Get "title" }} {{else}} {{.Get "name" }} {{end}}
    class="friendurl">
    <div class="frienddiv">
        <div class="frienddivleft">
            <img class="myfriend" src={{ .Get "logo" }} />
        </div>
        <div class="frienddivright">
            <div class="friendname">{{- .Get "name" -}}</div>
            <div class="friendinfo">{{- .Get "word" -}}</div>
        </div>
    </div>
</a>
{{- end }}
编辑 friends.en.md 、 friends.zh.md 文件
---
title: "友情链接"
draft: false
ShowReadingTime: false
showToc: false
TocOpen: false
enableCopyright: false
---
<! -- Remove the $ sign -->
{${< friends name="Rickey's blog" url="https://gdhblog.com" logo="https://gdhblog.com/avatar.png" word="Sincere records, life is worth living" >}}
About page
Add the
about.en.mdandabout.zh.mdfiles to thecontentfolder.Write the content and save it.
Side Hover Catalog
Hovering table of contents is a kind of user-friendly table of contents. Compared with the traditional table of contents fixed at the top of the article, the hovering table of contents can be continuously displayed in the field of view with the scrolling of the page, allowing readers to grasp the structure of the article at any time, and making it easier for them to quickly locate and jump around. This kind of interaction is conducive to improving the user’s reading experience.
- add the
toc.htmlfile to `layouts/partials - Add
toc.cssfile toassets/css/extended.
Note
If you don’t have a folder, just create one. Here is the code for the toc.html file and the toc.css file.
toc.html
{{- $headers := findRE "<h[1-6].*?>(.|\n])+?</h[1-6]>" .Content -}}
    {{- $has_headers := ge (len $headers) 1 -}}
    {{- if $has_headers -}}
    <aside id="toc-container" class="toc-container wide">
        <div class="toc">
            <details {{if (.Param "TocOpen" ) }} open{{ end }}>
                <summary accesskey="c" title="(Alt + C)">
                    <span class="details">{{- i18n "toc" | default "Table of Contents" }}</span>
                </summary>

                <div class="inner">
                    {{- $largest := 6 -}}
                    {{- range $headers -}}
                    {{- $headerLevel := index (findRE "[1-6]" . 1) 0 -}}
                    {{- $headerLevel := len (seq $headerLevel) -}}
                    {{- if lt $headerLevel $largest -}}
                    {{- $largest = $headerLevel -}}
                    {{- end -}}
                    {{- end -}}

                    {{- $firstHeaderLevel := len (seq (index (findRE "[1-6]" (index $headers 0) 1) 0)) -}}

                    {{- $.Scratch.Set "bareul" slice -}}
                    <ul>
                        {{- range seq (sub $firstHeaderLevel $largest) -}}
                        <ul>
                            {{- $.Scratch.Add "bareul" (sub (add $largest .) 1) -}}
                            {{- end -}}
                            {{- range $i, $header := $headers -}}
                            {{- $headerLevel := index (findRE "[1-6]" . 1) 0 -}}
                            {{- $headerLevel := len (seq $headerLevel) -}}

                            {{/* get id="xyz" */}}
                            {{- $id := index (findRE "(id=\"(.*?)\")" $header 9) 0 }}

                            {{- /* strip id="" to leave xyz, no way to get regex capturing groups in hugo */ -}}
                            {{- $cleanedID := replace (replace $id "id=\"" "") "\"" "" }}
                            {{- $header := replaceRE "<h[1-6].*?>((.|\n])+?)</h[1-6]>" "$1" $header -}}

                                {{- if ne $i 0 -}}
                                {{- $prevHeaderLevel := index (findRE "[1-6]" (index $headers (sub $i 1)) 1) 0 -}}
                                {{- $prevHeaderLevel := len (seq $prevHeaderLevel) -}}
                                {{- if gt $headerLevel $prevHeaderLevel -}}
                                {{- range seq $prevHeaderLevel (sub $headerLevel 1) -}}
                                <ul>
                                    {{/* the first should not be recorded */}}
                                    {{- if ne $prevHeaderLevel . -}}
                                    {{- $.Scratch.Add "bareul" . -}}
                                    {{- end -}}
                                    {{- end -}}
                                    {{- else -}}
                                    </li>
                                    {{- if lt $headerLevel $prevHeaderLevel -}}
                                    {{- range seq (sub $prevHeaderLevel 1) -1 $headerLevel -}}
                                    {{- if in ($.Scratch.Get "bareul") . -}}
                                </ul>
                                {{/* manually do pop item */}}
                                {{- $tmp := $.Scratch.Get "bareul" -}}
                                {{- $.Scratch.Delete "bareul" -}}
                                {{- $.Scratch.Set "bareul" slice}}
                                {{- range seq (sub (len $tmp) 1) -}}
                                {{- $.Scratch.Add "bareul" (index $tmp (sub . 1)) -}}
                                {{- end -}}
                                {{- else -}}
                        </ul>
                        </li>
                        {{- end -}}
                        {{- end -}}
                        {{- end -}}
                        {{- end }}
                        <li>
                            <a href="#{{- $cleanedID -}}" aria-label="{{- $header | plainify -}}">{{- $header | safeHTML
                                -}}</a>
                            {{- else }}
                        <li>
                            <a href="#{{- $cleanedID -}}" aria-label="{{- $header | plainify -}}">{{- $header | safeHTML
                                -}}</a>
                            {{- end -}}
                            {{- end -}}
                            <!-- {{- $firstHeaderLevel := len (seq (index (findRE "[1-6]" (index $headers 0) 1) 0)) -}} -->
                            {{- $firstHeaderLevel := $largest }}
                            {{- $lastHeaderLevel := len (seq (index (findRE "[1-6]" (index $headers (sub (len $headers)
                            1)) 1) 0)) }}
                        </li>
                        {{- range seq (sub $lastHeaderLevel $firstHeaderLevel) -}}
                        {{- if in ($.Scratch.Get "bareul") (add . $firstHeaderLevel) }}
                    </ul>
                    {{- else }}
                    </ul>
                    </li>
                    {{- end -}}
                    {{- end }}
                    </ul>
                </div>
            </details>
        </div>
    </aside>
    <script>
        let activeElement;
        let elements;
        window.addEventListener('DOMContentLoaded', function (event) {
            checkTocPosition();

            elements = document.querySelectorAll('h1[id],h2[id],h3[id],h4[id],h5[id],h6[id]');
            // Make the first header active
            activeElement = elements[0];
            const id = encodeURI(activeElement.getAttribute('id')).toLowerCase();
            document.querySelector(`.inner ul li a[href="#${id}"]`).classList.add('active');
        }, false);

        window.addEventListener('resize', function (event) {
            checkTocPosition();
        }, false);

        window.addEventListener('scroll', () => {
            // Check if there is an object in the top half of the screen or keep the last item active
            activeElement = Array.from(elements).find((element) => {
                if ((getOffsetTop(element) - window.pageYOffset) > 0 &&
                    (getOffsetTop(element) - window.pageYOffset) < window.innerHeight / 2) {
                    return element;
                }
            }) || activeElement

            elements.forEach(element => {
                const id = encodeURI(element.getAttribute('id')).toLowerCase();
                if (element === activeElement) {
                    document.querySelector(`.inner ul li a[href="#${id}"]`).classList.add('active');
                } else {
                    document.querySelector(`.inner ul li a[href="#${id}"]`).classList.remove('active');
                }
            })
        }, false);

        const main = parseInt(getComputedStyle(document.body).getPropertyValue('--article-width'), 10);
        const toc = parseInt(getComputedStyle(document.body).getPropertyValue('--toc-width'), 10);
        const gap = parseInt(getComputedStyle(document.body).getPropertyValue('--gap'), 10);

        function checkTocPosition() {
            const width = document.body.scrollWidth;

            if (width - main - (toc * 2) - (gap * 4) > 0) {
                document.getElementById("toc-container").classList.add("wide");
            } else {
                document.getElementById("toc-container").classList.remove("wide");
            }
        }

        function getOffsetTop(element) {
            if (!element.getClientRects().length) {
                return 0;
            }
            let rect = element.getBoundingClientRect();
            let win = element.ownerDocument.defaultView;
            return rect.top + win.pageYOffset;
        }
    </script>
    {{- end }}
toc.css
:root {
    --article-width: 650px;
    --toc-width: 230px;
  }

  .toc {
    margin: 0 2px 40px 2px;
    border: 1px solid var(--border);
    background: var(--entry);
    border-radius: var(--radius);
    padding: 0.4em;
  }

  .toc-container.wide {
    position: absolute;
    height: 100%;
    border-right: 1px solid var(--border);
    left: calc((var(--toc-width) * 0.9 + var(--gap)) * -1);
    top: calc(var(--gap) * 2);
    width: var(--toc-width);
  }

  .wide .toc {
    position: sticky;
    top: var(--gap);
    border: unset;
    background: unset;
    border-radius: unset;
    width: 100%;
    margin: 0 2px 40px 2px;
  }

  .toc details summary {
    cursor: zoom-in;
    margin-inline-start: 20px;
    padding: 12px 0;
  }

  .toc details[open] summary {
    font-weight: 500;
  }

  .toc-container.wide .toc .inner {
    margin: 0;
  }

  .toc .active {
    font-size: 110%;
    font-weight: 600;
    color: #614a85;
    text-decoration: underline;
  }

  .toc ul {
    list-style-type: circle;
  }

  .toc .inner {
    margin: 0 0 0 20px;
    padding: 0px 15px 15px 20px;
    font-size: 16px;

    max-height: 83vh;
    overflow-y: auto;
  }

  .toc .inner::-webkit-scrollbar-thumb {
    background: var(--border);
    border: 7px solid var(--theme);
    border-radius: var(--radius);
  }

  .toc li ul {
    margin-inline-start: calc(var(--gap) * 0.5);
    list-style-type: none;
  }

  .toc li {
    list-style: none;
    font-size: 0.95rem;
    padding-bottom: 5px;
  }

  .toc li a:hover {
    color: var(--secondary);
  }
Add a comment function
After reading a lot of comment “features”, I have decided to use Giscus.
- Go to Github and create a new repository, the name of the repository should be customized according to your needs, there is no requirement. The following 3 points should be noted:
- The repository is public, otherwise visitors will not be able to view the discussion.
- The giscus app is installed, otherwise visitors won’t be able to comment and respond.
- Discussions feature is enabled in your repository (if not, see here) enabling-features-for-your-repository/enabling-or-disabling-github-discussions-for-a-repository))
Log in to Giscus, scroll down, and in the Configuration section, enter the name of your GitHub repository and copy the generated code.
Open
hugo.yamland setcomments: true.Create a new file called
comments.htmlin the folderlayouts/partials/. Then paste the code generated by Giscus into it and save it.
Setting up the web icon
Tip
The website icon here refers to the small icon in the browser tab.
- Place the icon in
/static/img/ - Adjust the
hugo.yamlfile.
  assets:
    # disableHLJS: true # to disable highlight.js
    # disableFingerprinting: true
    favicon: "img/favicon.gif"
    favicon16x16: "img/favicon.gif"
    favicon32x32: "img/favicon.gif"
    apple_touch_icon: "img/favicon.gif"
    safari_pinned_tab: "img/favicon.gif"
Add icons to the menu bar
Here, I am using icons from the FontAwesome family.
Visit FontAwesome
On the FontAwesome homepage, click the [Start for Free] button.
Enter your email address, click the [Send Kit Embed Code] button, and follow the prompts to register.
Then get a line of
scriptembedded code.Copy the
extend_head.htmlfile from the theme folder (themes/paperMod/layouts/partials) to thethemes/paperMod/layouts/partialsfolder under the root directory, and paste thescriptprovided byFontAwesomeinto it. provided byFontAwesomeand paste in thescriptprovided byFontAwesome.
{{- /* Head custom content area start */ -}}
{{- /*     Insert any custom code (web-analytics, resources, etc.) - it will appear in the <head></head> section of every page. */ -}}
{{- /*     Can be overwritten by partial with the same name in the global layouts. */ -}}
{{- /* Head custom content area end */ -}}

<!-- Introducing FontAwesome icons -->
<script src="https://kit.fontawesome.com/xxxxxx.js" crossorigin="anonymous"></script>
6.Modify menu.main in the hugo.yaml configuration file ref:
menu:
      main:
        - identifier: search
          name: ' Search'
          url: /search/
          pre: '<i class="fa-solid fa-magnifying-glass"></i>'
          weight: 1
        - identifier: posts
          name: ' Posts'
          url: /posts/
          pre: '<i class="fa-solid fa-newspaper"></i>'
          weight: 2
Open Outbound in New Tab in Menu Bar
I recently added Open To to the menu bar in the top right corner, but when I clicked on it, it didn’t open in a new tab, which wasn’t a very good experience, so I’m going to modify it.
Copy the header.html file from the theme folder (themes/paperMod/layouts/partials) to the themes/paperMod/layouts/partials folder in the root directory, add {{- if (hasPrefix . Identifier “ext-”) }} code.
Here is the code snippet for the header.html file.
<ul id="menu">
{{- range site.Menus.main }}
{{- $menu_item_url := (cond (strings.HasSuffix .URL "/") .URL (printf "%s/" .URL) ) | absLangURL }}
{{- $page_url:= $currentPage.Permalink | absLangURL }}
{{- $is_search := eq (site.GetPage .KeyName).Layout `search` }}
<li>
<a href="{{ .URL | absLangURL }}" {{- if (hasPrefix .Identifier "ext-") }} target="_blank" {{- end }} title="{{ .Title | default .Name }} {{- cond $is_search(Alt + /)" | safeHTMLAttr) ("" | safeHTMLAttr ) }}"
{{- cond $is_search (" accesskey=/" | safeHTMLAttr) ("" | safeHTMLAttr ) }}>
<span {{- if eq $menu_item_url $page_url }} class="active" {{- end }}>
{{- .Pre }}
{{- .Name -}}
{{ .Post -}}
</span>
{{- if (findRE "://" .URL) }}
<svg fill="none" shape-rendering="geometricPrecision" stroke="currentColor" stroke-linecap="round"
stroke-linejoin="round" stroke-width="2.5" viewBox="0 0 24 24" height="12" width="12">
<path d="M18 13v6a2 2 0 01-2 2H5a2 2 0 01-2-2V8a2 2 0 012-2h6"></path>
<path d="M15 3h6v6"></path>
<path d="M10 14L21 3"></path>
</svg>
{{- end }}
</a>
</li>
{{- end }}
</ul>
Then just adjust the identifier attribute of the corresponding menu in the hugo.yaml configuration file.
    menu:
      main:
        - identifier: search
          name: ' Search'
          url: /search/
          pre: '<i class="fa-solid fa-magnifying-glass"></i>'
          weight: 1
        - identifier: ext-travelling # “ ext- ” will open in a new tab
          name: ' Travellings'
          url: https://www.travellings.cn/go.html
          pre: '<i class="fa-solid fa-train-subway"></i>'
          weight: 9
Add copyright information
I’ve written a separate blog post for instructions, please move to:
PaperMod Theme - Adding Copyright Information
Add ungarlic count
1.Add parameters to the hugo.yaml file
params:
  busuanzi:
    enable: true
2.Add “site visits” at the bottom: open the layouts/partials/footer.html file and add the code (just put it above the </footer> tag):
<!-- Begin. ungarlic count -->
{{ if .Site.Params.busuanzi.enable -}}
  <div class="busuanzi-footer">
    {{ if eq $lang "zh" }}
    <span id="busuanzi_container_site_pv">站点访问量:<span id="busuanzi_value_site_pv"></span></span>
    {{- else }}
    <span id="busuanzi_container_site_pv">Site Visits:<span id="busuanzi_value_site_pv"></span></span>
    {{- end -}}
  </div>
{{- end -}}
<!-- End. ungarlic count -->
3.Show the readership of each article: open the layouts/_default/single.html file and add the code (just put it in the <div class=“post-meta”> tag):
<div class="post-meta">
{{- partial "post_meta.html" . -}}
{{- partial "translation_list.html" . -}}
{{- partial "edit_post.html" . -}}
{{- partial "post_canonical.html" . -}}
<!-- Begin. ungarlic count -->
{{- if .Site.Params.busuanzi.enable -}}
{{ $lang := .Site.Language.Lang }}
<div class="meta-item"> · 
{{ if eq $lang "zh" }}
<span id="busuanzi_container_page_pv">阅读量:<span id="busuanzi_value_page_pv"></span></span>
{{- else }}
<span id="busuanzi_container_page_pv">Readings: <span id="busuanzi_value_page_pv"></span></span>
{{- end }}
</div>
{{- end }}
<!-- End. ungarlic count -->
</div>
Adjust Table styles
Add a new render-table.html file to the layouts/_default/_markup folder.
render-table.html
<table
  {{- range $k, $v := .Attributes }}
    {{- if $v }}
      {{- printf " %s=%q" $k $v | safeHTMLAttr }}
    {{- end }}
  {{- end }} class="custom_table_style">
  <thead>
    {{- range .THead }}
      <tr>
        {{- range . }}
          <th
            {{- with .Alignment }}
              {{- printf " style=%q" (printf "text-align: %s" .) | safeHTMLAttr }}
            {{- end -}}
          >
            {{- .Text -}}
          </th>
        {{- end }}
      </tr>
    {{- end }}
  </thead>
  <tbody>
    {{- range .TBody }}
      <tr>
        {{- range . }}
          <td
            {{- with .Alignment }}
              {{- printf " style=%q" (printf "text-align: %s" .) | safeHTMLAttr }}
            {{- end -}}
          >
            {{- .Text -}}
          </td>
        {{- end }}
      </tr>
    {{- end }}
  </tbody>
</table>

<style>
.post-content table:not(.lntable .highlighttable,.highlight table,.gist .highlight){
  display: table;
  background-color: transparent;
  border-radius: 6px;
  border: 1px solid black;
  outline: 2px solid black;
  overflow-x: auto;
  table-layout: fixed;
  word-break: break-all;
  font-size: 12px;
}

.dark .post-content table:not(.lntable .highlighttable,.highlight table,.gist .highlight){
  outline: 2px solid rgb(54, 156, 95);
}

.post-content table:not(.lntable .highlighttable,.highlight table,.gist .highlight) thead{
  background-color: #545d7b8a;
}

.dark .post-content table:not(.lntable .highlighttable,.highlight table,.gist .highlight) thead{
  background-color: rgb(62, 62, 62);
}

.post-content table:not(.lntable .highlighttable,.highlight table,.gist .highlight) td,
.post-content table:not(.lntable .highlighttable,.highlight table,.gist .highlight) tr,
.post-content table:not(.lntable .highlighttable,.highlight table,.gist .highlight) th{
  border-bottom: unset;
  border: 1px solid black,
}

.post-content table:not(.lntable .highlighttable,.highlight table,.gist .highlight) td:hover,
.post-content table:not(.lntable .highlighttable,.highlight table,.gist .highlight) td:focus{
  background-color: rgba(67, 166, 86, 0.8);
}

.dark .post-content table:not(.lntable .highlighttable,.highlight table,.gist .highlight) td:hover,
.dark .post-content table:not(.lntable .highlighttable,.highlight table,.gist .highlight) td:focus{
  background-color: rgb(0, 0, 0, 0.7);
}
</style>
How to write an article
The basics
What is FrontMatter
What is the default.md file under archetypes and how is it used?
In Hugo, the archetypes directory contains template files, usually named default.md, that are used to define the default front data (Front Matter) for newly created content. When you create a new article or page with Hugo, these templates are automatically populated into the new file to give you a basic structure.
Predefined Fields: The file can contain commonly used front data fields such as
title,date,tags,categories, etc., which you can use directly when creating new content instead of having to manually enter them each time.Unified Formatting: By using templates, you can ensure that all newly created content follows the same format and structure.
Commonly used FrontMatter
Here’s the FrontMatter that I use frequently.
Front-Matter
---
title: '{{ replace .File.ContentBaseName "-" " " | title }}' # Title of current post
description: ''  # Subtitle of the current post
date: '{{ .Date }}' # Date created
author: "Rickey" # author
slug: '' Article Url
showToc: true # Show Toc
TocOpen: true # Expand the catalog automatically
enableCopyright: true # Show copyright information
comments: true # Show comments
weight: null # If top, then the corresponding number
draft: false # If or not it is a draft

Categories:
  - Example

Tags:
  - Example

keywords:
    - keywords1
    - keywords2
    - keywords3

cover:
  # Alternative text for images, for accessibility and for displaying text when an image fails to load
  alt: ''
  # Caption text for images, usually used to describe the content of the image
  caption: ''
  # Path to the cover image, either a relative path or an absolute URL, to specify the actual cover image
  image: ''
  # Indicates if the image path is relative. If true, the path is considered relative to the current content file; if false, it is considered absolute.
  relative: false
---