Preface
This article will describe how to use “Notifications” in the Dynamics CRM App through a specific scenario. I will demonstrate three different methods to push notifications to users:
- Cloud Flow
- Client API
- Csharp(C#)
1.Enable App Notifications
Navigate to Power Apps –> Click on the “App” tab in the menu bar –> Locate your application –> Click on the three dots (•••) –> Select “Edit”.
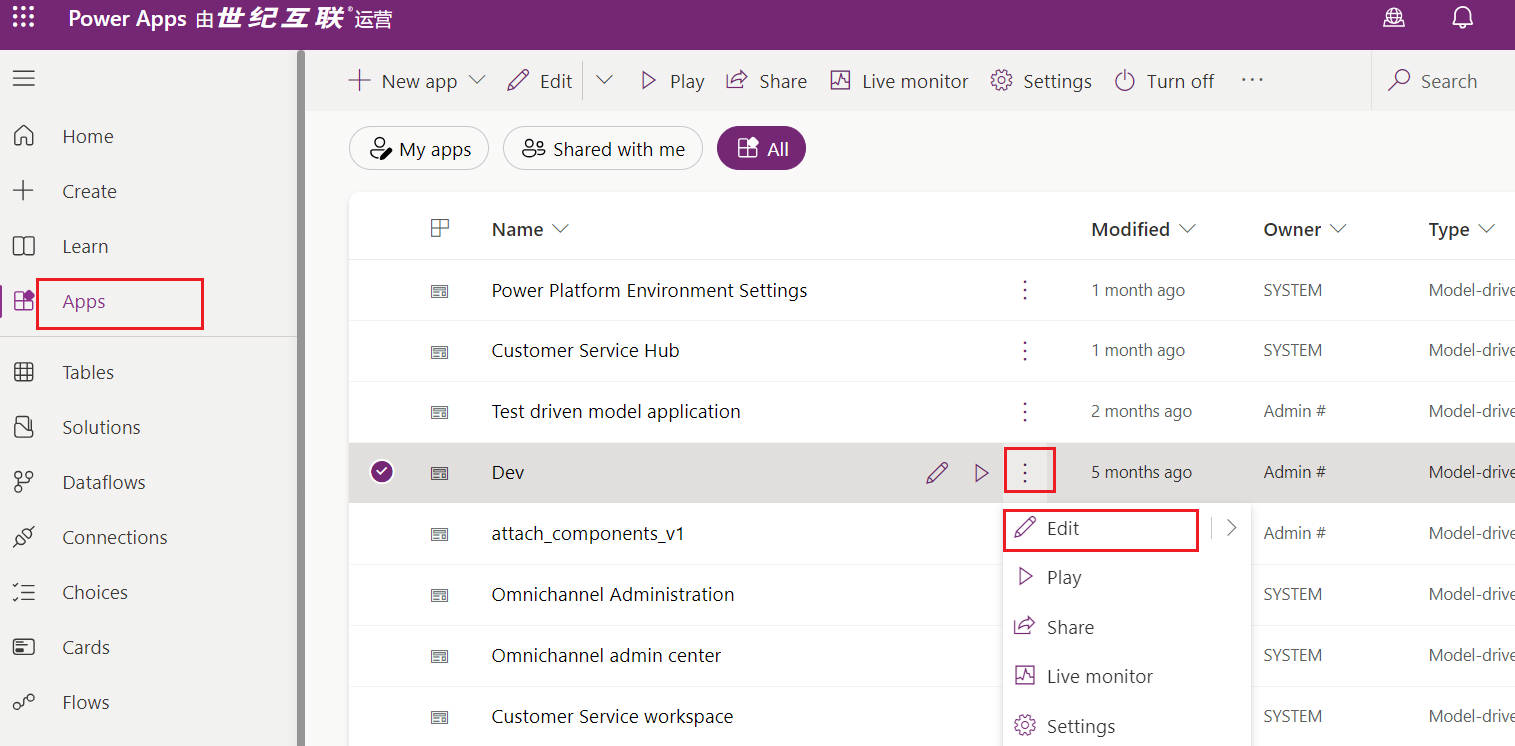
Navigate to Power Apps
Click the “Settings” button at the top of the app editing page.
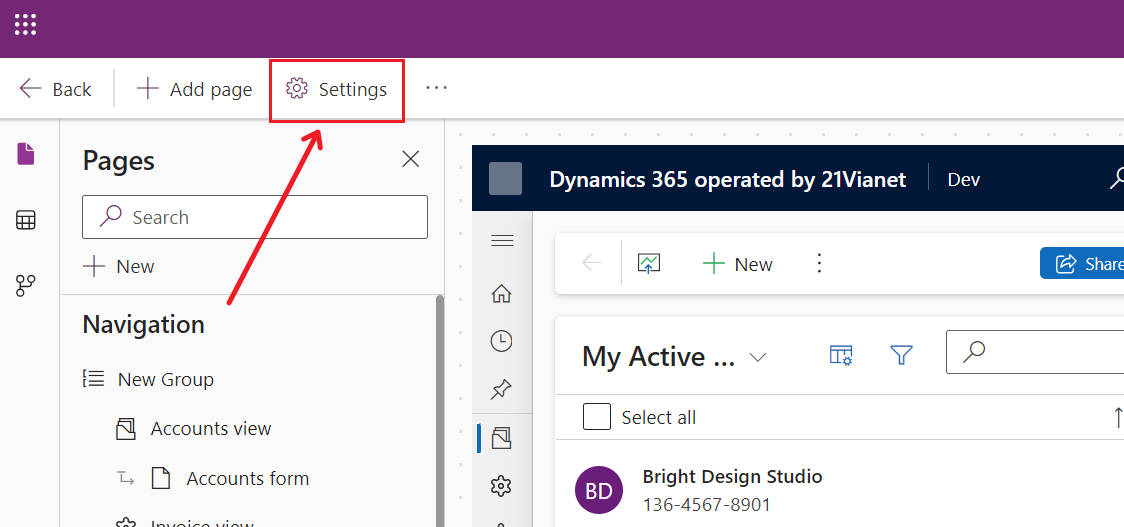
Power Apps App Setting
Click on the “Features” tab –> Enable “In-App Notification” –> Click “Save”.
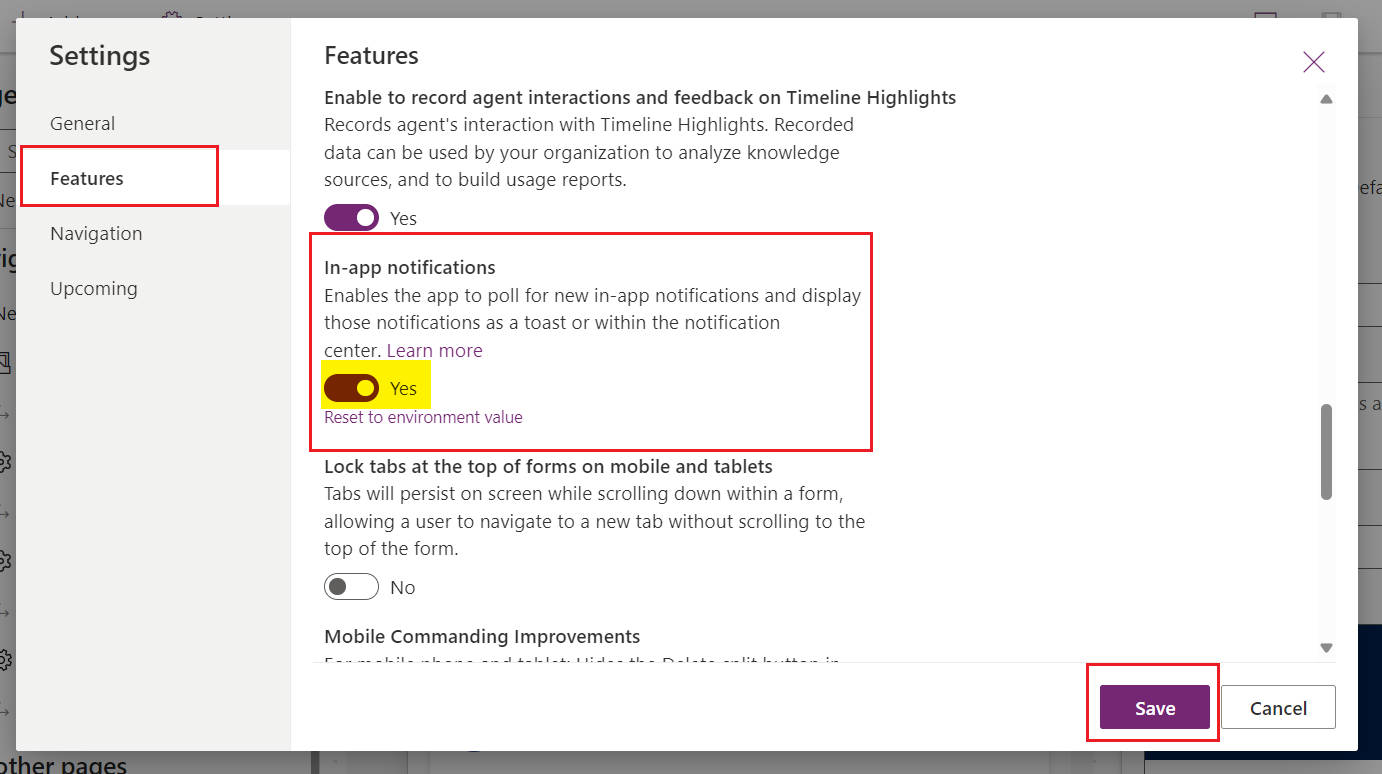
Enable App Notifications
If everything goes smoothly, you should be able to see the Notification table in the Table section.
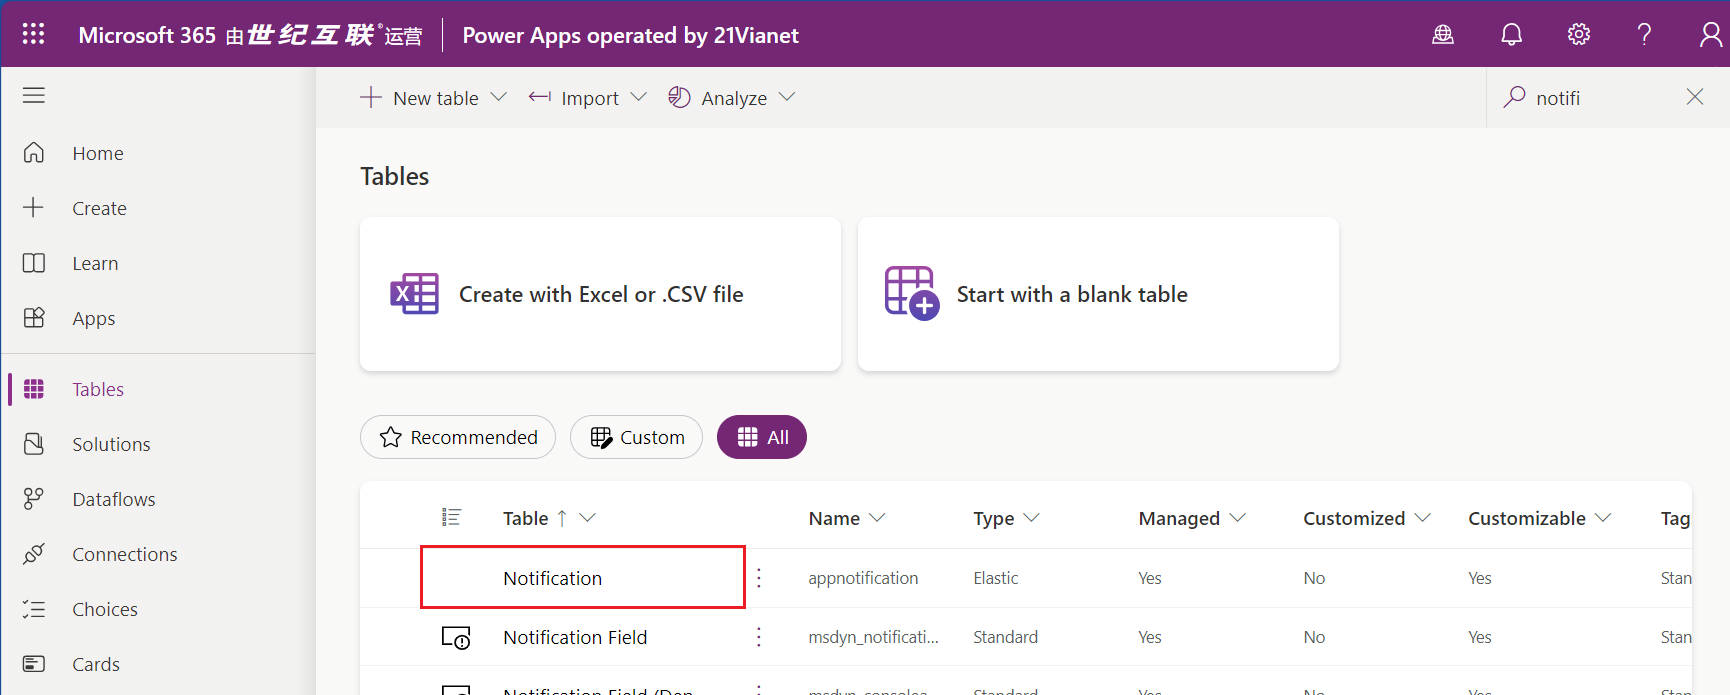
Notification table
2. Create Notifications
Method 1: Using Cloud Flow
When a customer record is assigned, notify the assigned user:
“Customer XXXX has been assigned to you. Please contact the customer promptly.”
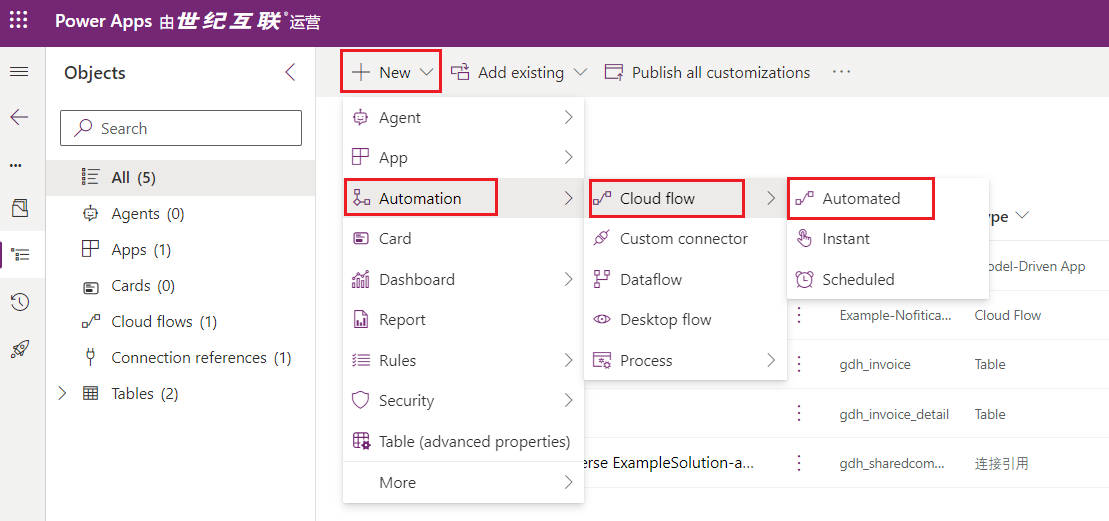
(1) Create a New Flow
Go to Solutions –> Click New –> Select Automation –> Choose Cloud Flow –> Select Automated.
Create Cloud Flow
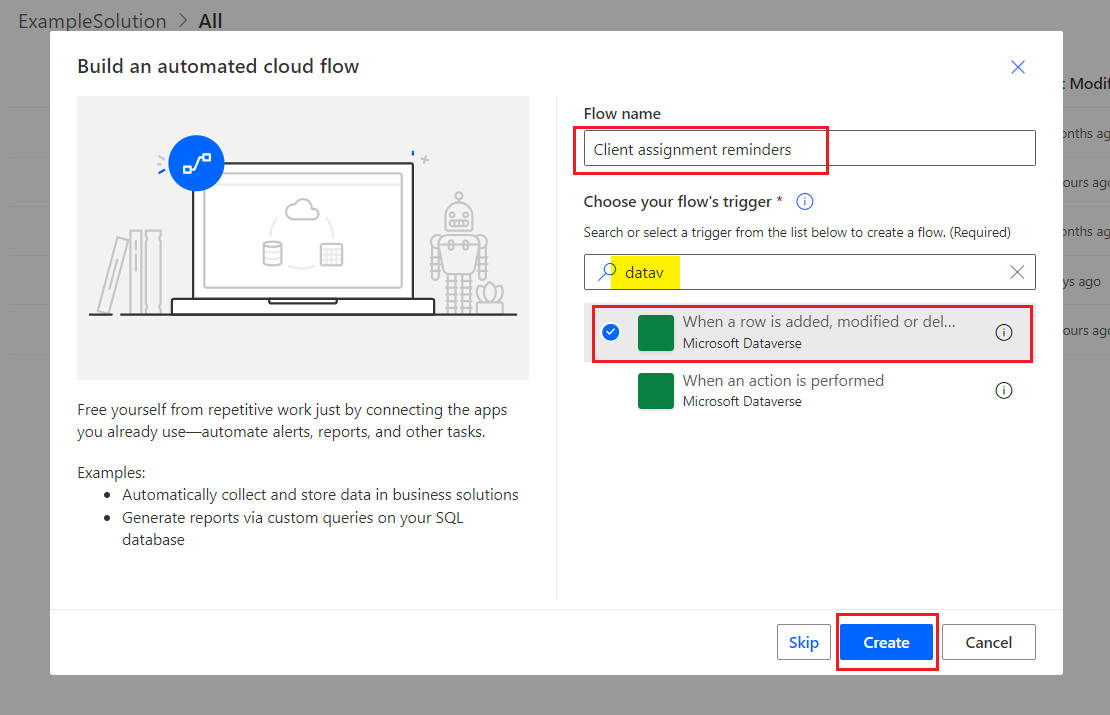
Enter a meaningful Flow Name –> Use fuzzy search by entering “Dataverse” –> Select “When a row is added, modified, or deleted” trigger –> Click “Create”.
Create Cloud Flow
(2) Configure the Flow
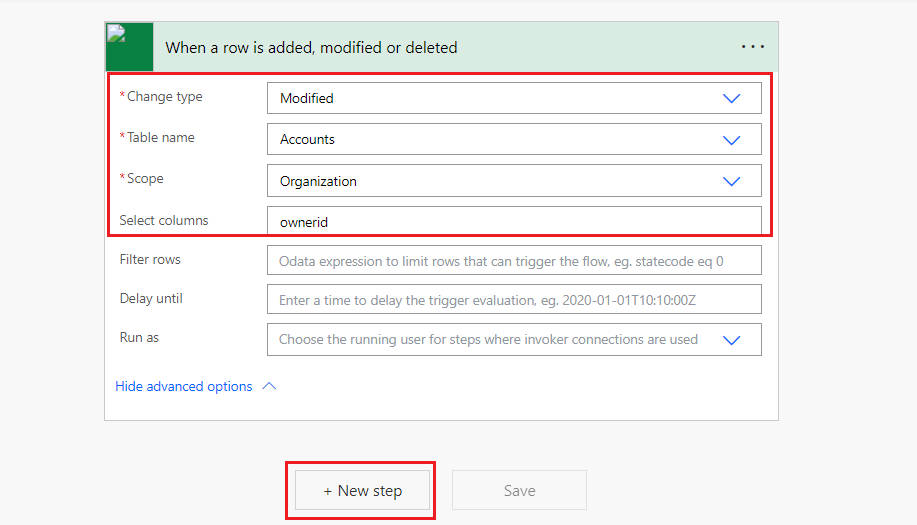
(1)Configure the “When a row is added, modified, or deleted” trigger.
- Change type:Modified
- Table name:Accounts
- Scope:Organization
- Select columns:ownerid
Configure the Trigger by specifying
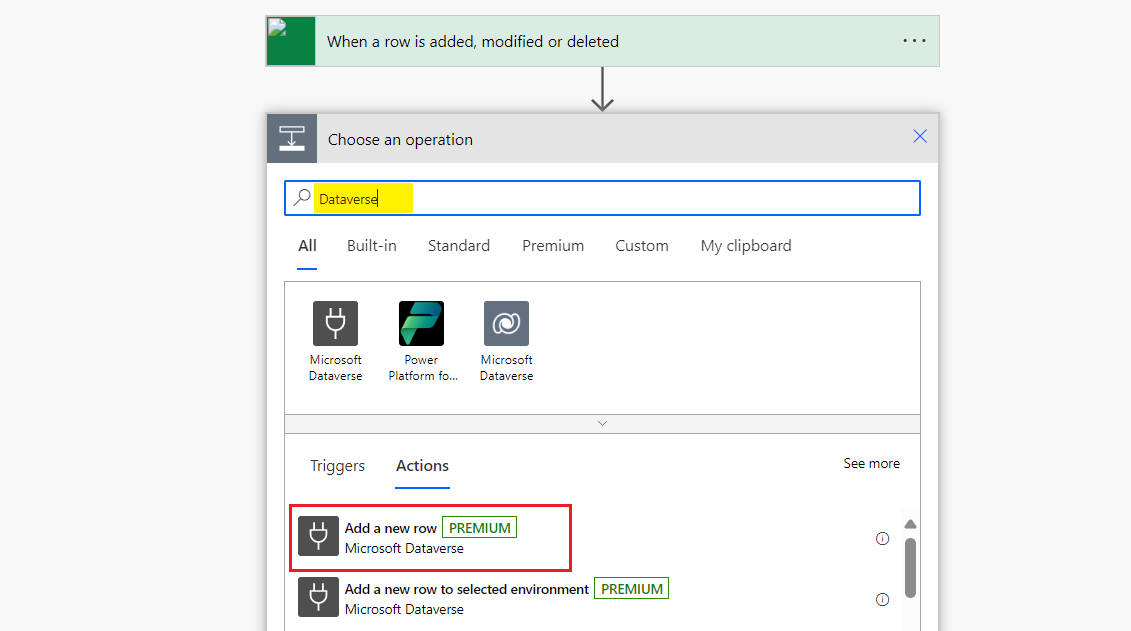
(2)Use fuzzy search by entering “Dataverse”, then select the “Add a new row” action.
Select Action
(3)Configure the “Add a new row” action, then click the Save button.

Configure Action
- Table name:Select
Notifications - Title:Enter
Client assignment reminders - Body:Enter
Customer [Variable:Account Name] has been assigned to you, please contact the customer in time. - Expiry (seconds):Enter
1200 - IconType:Select
Success - Owner (Owners):Enter
/systemusers(Variable: Owner(Value)) - Data:Enter the following JSON, where entityLogicalName should be set to “account”, and RecordId needs to be replaced.
{
    "actions": [
        {
            "title": "Open Account record",
            "data":
            {
                "url": "?pagetype=entityrecord&etn=account&id=变量:Account",
                "navigationTarget": "newWindow"
            }
        }
    ]
}
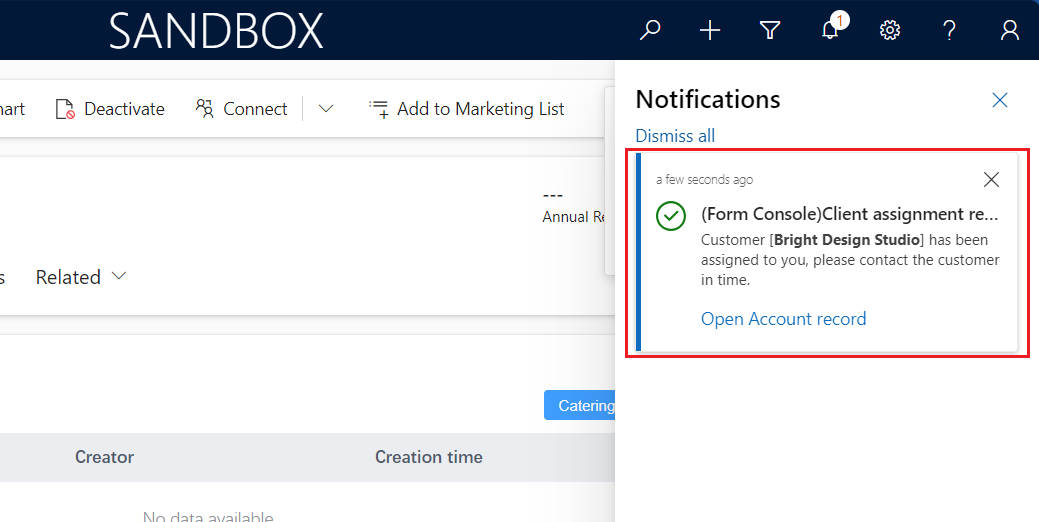
(3) Test the Flow
Open a customer record and assign it to yourself.
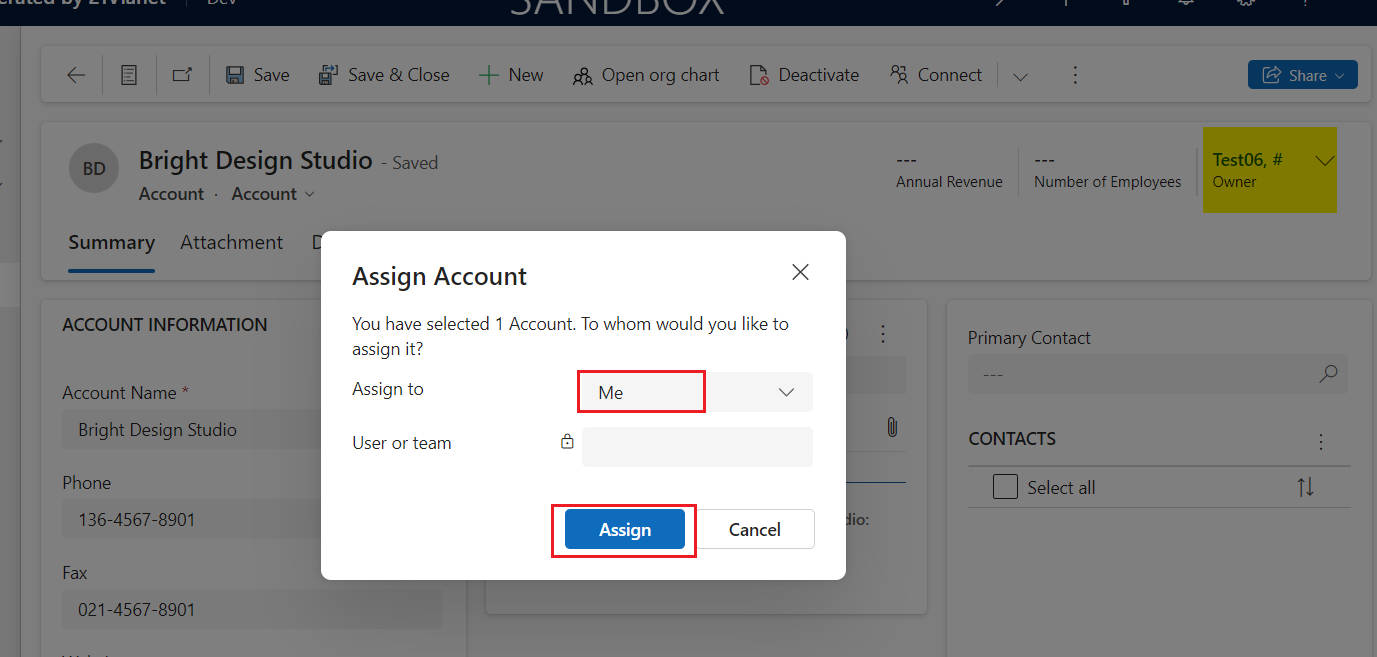
Open a customer record and assign it to yourself.
If everything goes smoothly, you will see a pop-up notification in the top right corner.
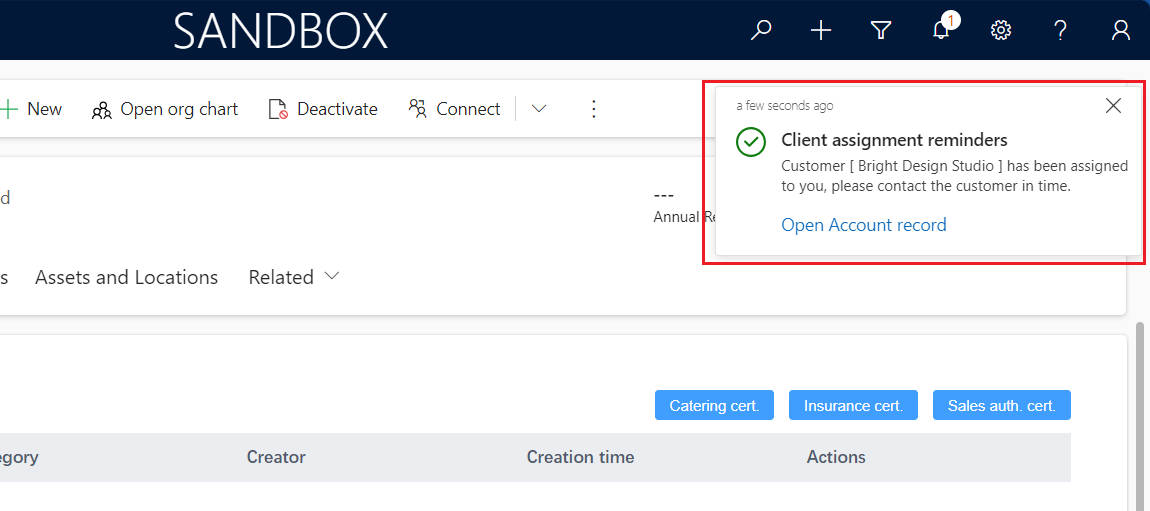
A pop-up notification will appear in the top right corner.
Click the small bell icon in the top-right menu bar to expand the notifications.
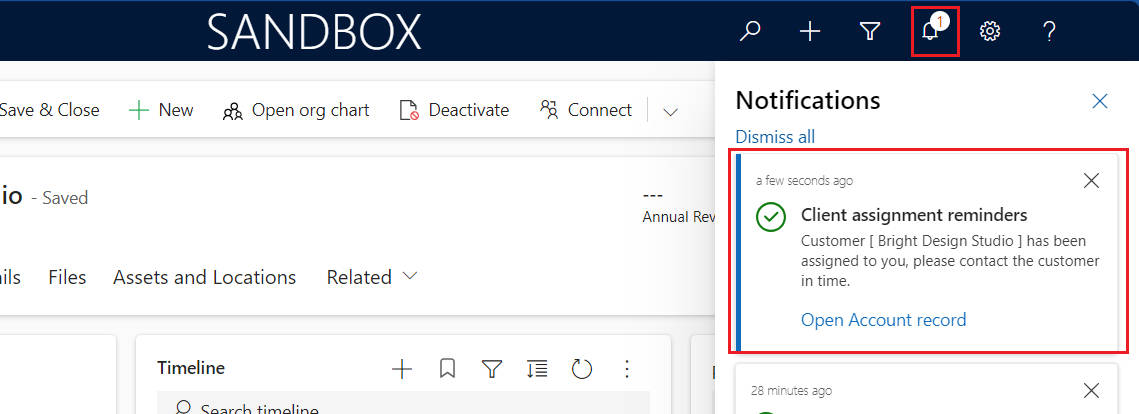
Expand the notifications.
Similarly, users can see the notifications in the Power Apps mobile application.
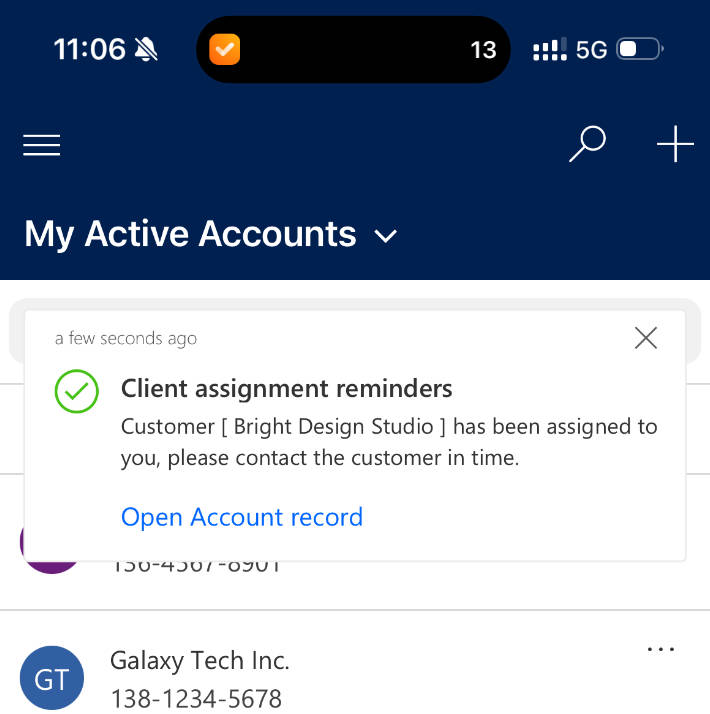
Notifications seen in the Power Apps mobile application.
Method 2: Using Client API
- Add the Example In-App Notification button to the customer form.
- After clicking the button, create a notification.
(1) Write JavaScript Code
Here is the JavaScript code used for this scenario:
/**
 * Example code ...
 */
'use strict';
if (Gdh === undefined) { var Gdh = {}; }
if (Gdh.D365 === undefined) { Gdh.D365 = {}; }
if (Gdh.D365.Account === undefined) { Gdh.D365.Account = {}; }
(function () {
    this.formOnLoad = function (executionContext) {
        //var formContext = executionContext.getFormContext();
    }

    this.formOnSave = function () {
        Xrm.Navigation.openAlertDialog({ text: "Record saved." });
    }

    this.ExampleCallAppNotification = function (executionContext) {
        var formContext = executionContext;
        var currentUserID = Xrm.Utility.getGlobalContext().userSettings.userId.replace("{", "").replace("}", "");
        var accountName = formContext.getAttribute("name").getValue();
        var sBody = `Customer [**${accountName}**] has been assigned to you, please contact the customer in time.`;
        var currentRecordId = formContext.data.entity.getId().replace("{", "").replace("}", "");
        var url = `?pagetype=entityrecord&etn=account&id=${currentRecordId}`;
        var tData = {
            "@odata.type": "Microsoft.Dynamics.CRM.expando",
            "actions@odata.type": "#Collection(Microsoft.Dynamics.CRM.expando)",
            "actions": [
                {
                    "title": "Open Account record",
                    "data": {
                        "@odata.type": "#Microsoft.Dynamics.CRM.expando",
                        "type": "url",
                        "url": url,
                        "navigationTarget": "newWindow"
                    }
                }
            ]
        }
        var SendAppNotificationRequest = new this.SendAppNotificationRequest(
            "Client assignment reminders",
            `/systemusers(${currentUserID})`,
            sBody,
            200000000,
            100000001,
            200000000,
            null,
            null,
            tData
        );
        Xrm.WebApi.online.execute(SendAppNotificationRequest).then(function (response) {
            if (response.ok) {
                console.log("Status: %s %s", response.status, response.statusText);

                return response.json();
            }
        })
            .then(function (responseBody) {
                console.log("Response Body: %s", responseBody.NotificationId);
            })
            .catch(function (error) {
                console.log(error.message);
            });
    }

    this.SendAppNotificationRequest = function (
        title,
        recipient,
        body,
        priority,
        iconType,
        toastType,
        expiry,
        overrideContent,
        actions) {
        this.Title = title;
        this.Recipient = recipient;
        this.Body = body;
        this.Priority = priority;
        this.IconType = iconType;
        this.ToastType = toastType;
        this.Expiry = expiry;
        this.OverrideContent = overrideContent;
        this.Actions = actions;
    };

    this.SendAppNotificationRequest.prototype.getMetadata = function () {
        return {
            boundParameter: null,
            parameterTypes: {
                "Title": {
                    "typeName": "Edm.String",
                    "structuralProperty": 1
                },
                "Recipient": {
                    "typeName": "mscrm.systemuser",
                    "structuralProperty": 5
                },
                "Body": {
                    "typeName": "Edm.String",
                    "structuralProperty": 1
                },
                "Priority": {
                    "typeName": "Edm.Int",
                    "structuralProperty": 1
                },
                "IconType": {
                    "typeName": "Edm.Int",
                    "structuralProperty": 1
                },
                "ToastType": {
                    "typeName": "Edm.Int",
                    "structuralProperty": 1
                },
                "Expiry": {
                    "typeName": "Edm.Int",
                    "structuralProperty": 1
                },
                "OverrideContent": {
                    "typeName": "mscrm.expando",
                    "structuralProperty": 5
                },
                "Actions": {
                    "typeName": "mscrm.expando",
                    "structuralProperty": 5
                },
            },
            operationType: 0,
            operationName: "SendAppNotification",
        }
    }
}).call(Gdh.D365.Account);
(2) Upload the code as a web resource
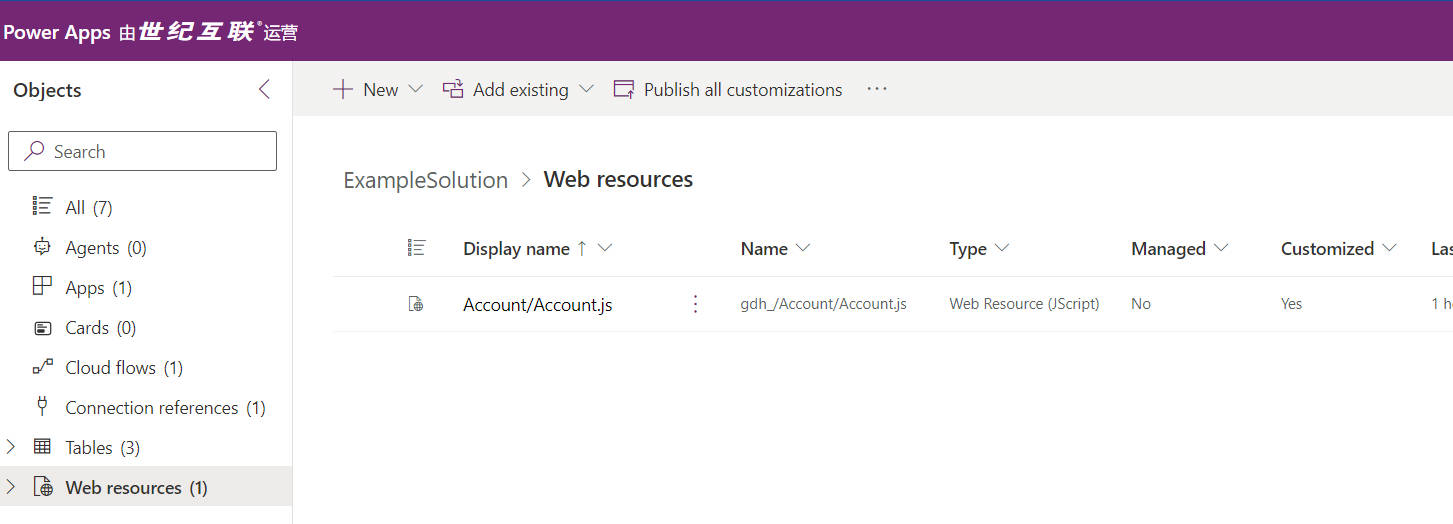
Upload the code as a web resource.
(3) Add a Button
Go to Solutions –> Select Account –> Choose Commands –> Click New Command.

Add a Button -01
Click “+New”
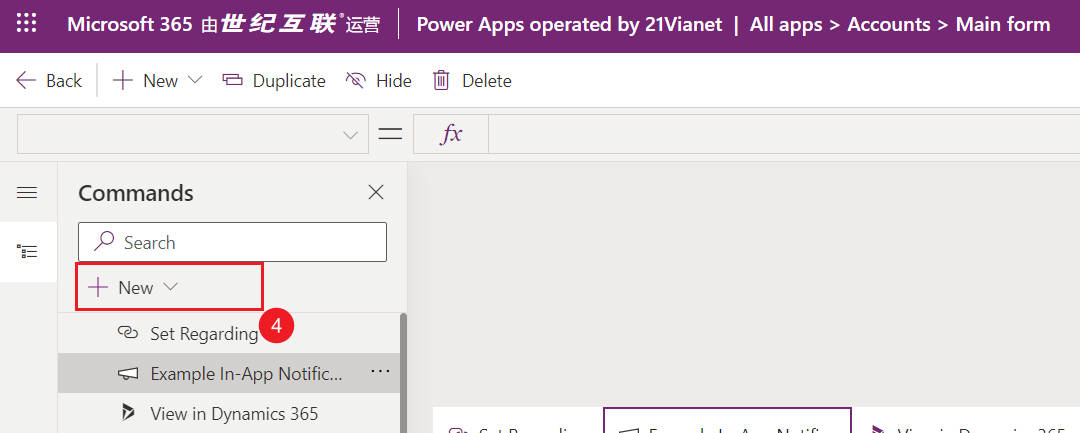
Add a Button -02
Fill in the button details –> Click Save and Publish.
- Label:Example In-App Notification
- Action:Run JavaScript
- Library:gdh_/Account/Account.js | Gdh.D365.Account.ExampleCallAppNotification
- Parameter:PrimaryControl
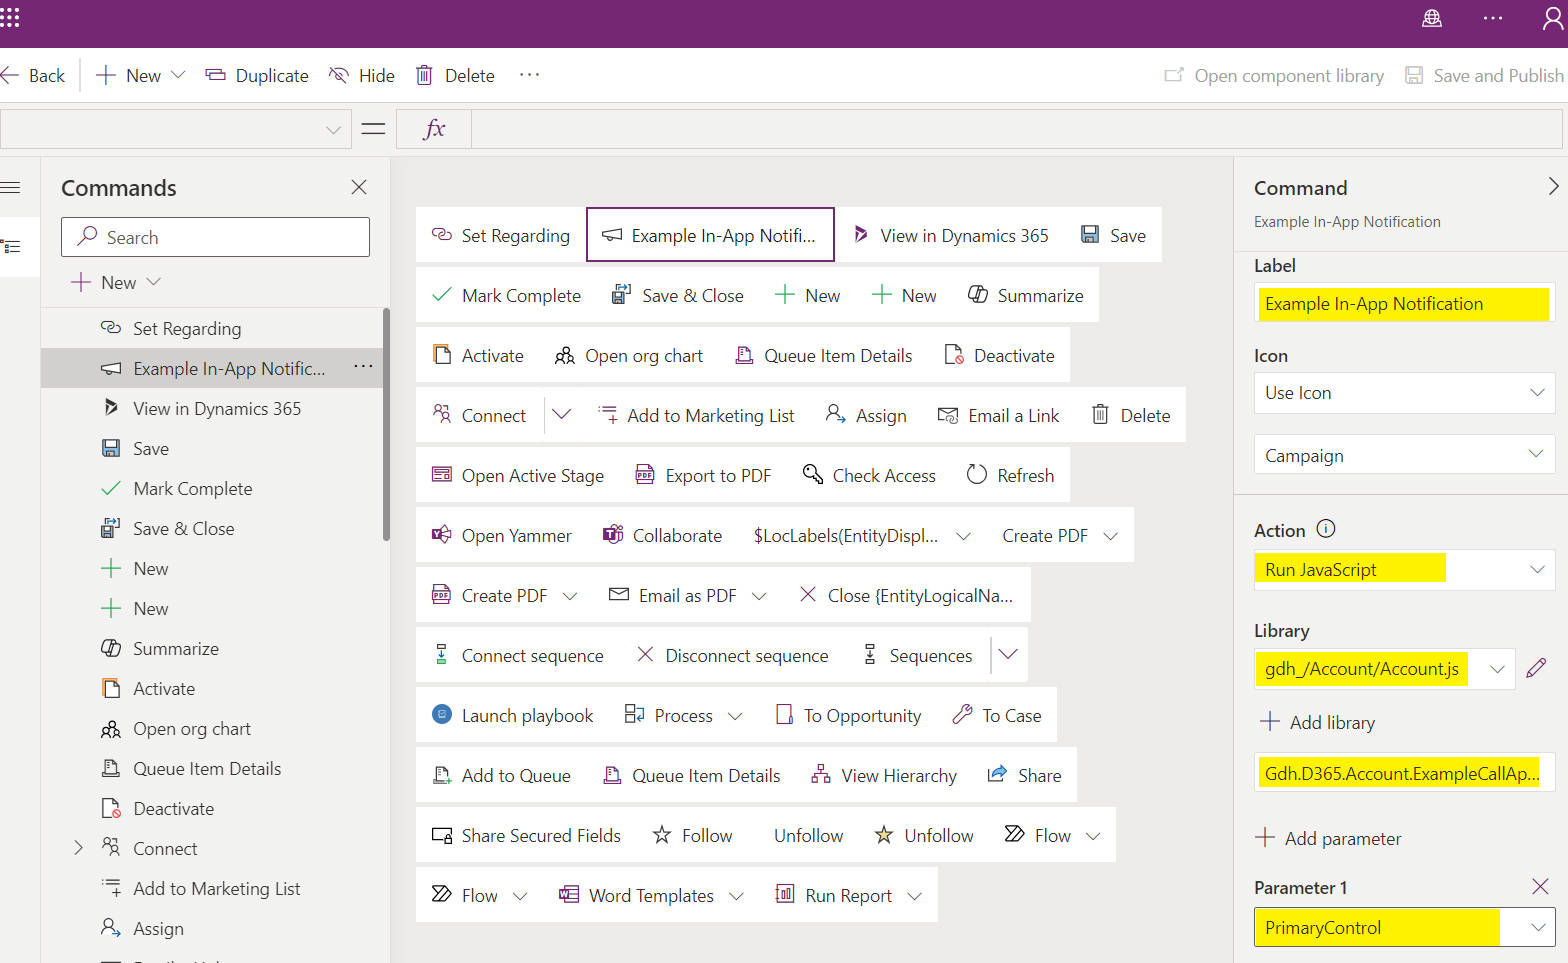
Add a Button -03
(4) Test
After clicking the Example In-App Notification button, you will see a pop-up notification in the top right corner.
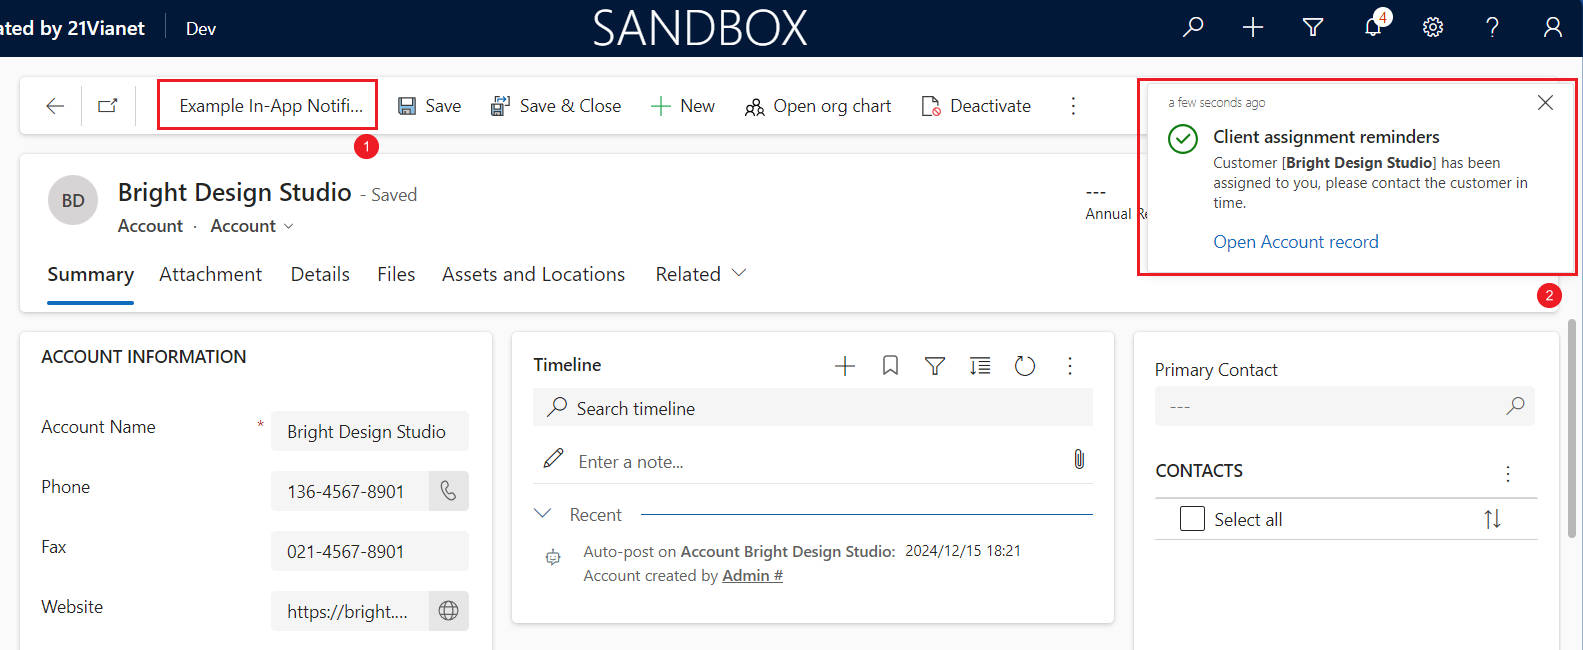
A notification will pop up as a floating message.
Method 3: Using Csharp
Add the following code in a console application and run it.
using Microsoft.Xrm.Sdk;
using Microsoft.Xrm.Tooling.Connector;
using System;
using System.Configuration;

namespace Blog.D365.Conn.ConsoleApp
{
    public class Program
    {
        static void Main(string[] args)
        {
            string connectionStr = ConfigurationManager.ConnectionStrings["Dev-Office365"].ConnectionString;
            CrmServiceClient client = new CrmServiceClient(connectionStr);
            if (client.IsReady)
            {
                IOrganizationService orgService = client;
                NotificationService notificationService = new NotificationService(orgService);
                notificationService.CreateAppNotification(
                    "Client assignment reminders -- Form Console",
                    new Guid("DDF2C431-A1DF-EE11-904D-0017FA06CFC8"),
                    "Customer [**Bright Design Studio**] has been assigned to you, please contact the customer in time.",
                    new OptionSetValue(100000001),
                    new OptionSetValue(200000000),
                    "?pagetype=entityrecord&etn=account&id=23956352-CEBA-EF11-B8E8-0017FA0527B1",
                    "newWindow"
                );
            }
            else
            {
                throw new Exception(client.LastCrmError);
            }
        }
    }

    public class NotificationService
    {
        private readonly IOrganizationService _orgService;

        public NotificationService(IOrganizationService orgService)
        {
            _orgService = orgService;
        }

        public void CreateAppNotification(
            string title,
            Guid recipientId,
            string body,
            OptionSetValue iconType,
            OptionSetValue toastType,
            string url,
            string navigationTarget,
            Entity overrideContent = null)
        {
            OrganizationRequest request = new OrganizationRequest
            {
                RequestName = "SendAppNotification",
                Parameters = new ParameterCollection
                {
                    ["Title"] = title,
                    ["Recipient"] = new EntityReference("systemuser", recipientId),
                    ["Body"] = body,
                    ["IconType"] = iconType,
                    ["ToastType"] = toastType,
                    ["Actions"] = new Entity
                    {
                        Attributes = {
                            ["actions"] = new EntityCollection
                            {
                                Entities = {
                                    new Entity
                                    {
                                        Attributes = {
                                            ["title"] = "Open Account record",
                                            ["data"] = new Entity
                                            {
                                                Attributes = {
                                                    ["type"] = "url",
                                                    ["url"] = url,
                                                    ["navigationTarget"] = navigationTarget
                                                }
                                            }
                                        }
                                    }
                                }
                            }
                        }
                    },
                    ["OverrideContent"] = overrideContent,
                }
            };
            _orgService.Execute(request);
        }
    }
}
The expected result after running the console application is a notification appearing in the Dynamics CRM app.
3.Common Properties
(1) ToastType
| ToastType | Value | Description |
|---|---|---|
| Timed | 200000000 | The notification will appear briefly (default is 4 seconds) before disappearing. |
| Hidden | 200000001 | The notification will not pop up; it can only be seen by clicking the bell icon (Notification Center) in the top right corner. |
(2) IconType optionset
| IconType | Value |
|---|---|
| Info | 100000000 |
| Success | 100000001 |
| Failure | 100000002 |
| Warning | 100000003 |
| Mention | 100000004 |
| Custom | 100000005 |
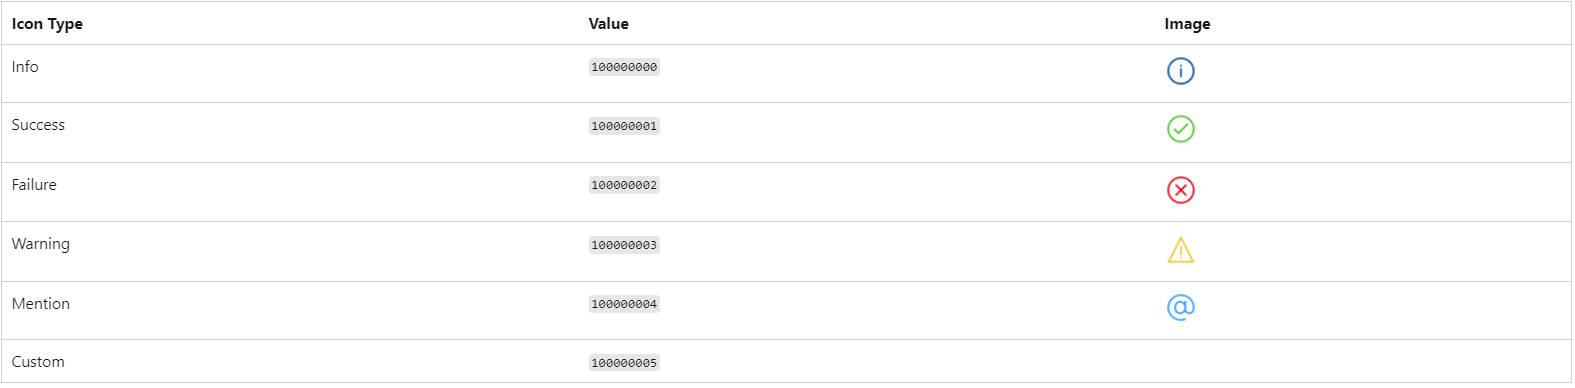
IconType 选项
(3) Set Notification Priority
Adjust the Priority property to change the display order of notifications in the Notification Center.
| Priority | Value |
|---|---|
| Normal | 200000000 |
| High | 200000001 |
Normal. Notifications in the Notification Center are sorted in descending order based on priority and creation date. High-priority notifications appear at the top of the list.(4) Notification actions
this.ExampleCallAppNotification = function (executionContext) {
    // ...
    var url = `?pagetype=entityrecord&etn=account&id=${currentRecordId}`;
    var tData = {
        "@odata.type": "Microsoft.Dynamics.CRM.expando",
        "actions@odata.type": "#Collection(Microsoft.Dynamics.CRM.expando)",
        "actions": [
            {
                "title": "Open Account record",
                "data": {
                    "@odata.type": "#Microsoft.Dynamics.CRM.expando",
                    "type": "url",
                    "url": url,
                    "navigationTarget": "newWindow"
                }
            }
        ]
    }
    // ...
}
The Priority property supports three action types:
| Priority | Value |
|---|---|
| Normal | 200000000 |
| High | 200000001 |
(5) Define URL Action
The URL action type allows navigation to a specified URL from an in-app notification action. The following parameters are supported:
url: The URL to open when the action is selected.navigationTarget: Controls where the link opens:dialog– Opens in a dialog box.inline– (Default) Opens in the current page.newWindow– Opens in a new browser tab.
this.ExampleCallAppNotification = function (executionContext) {
    // ...
    var url = `?pagetype=entityrecord&etn=account&id=${currentRecordId}`;
    var tData = {
        "@odata.type": "Microsoft.Dynamics.CRM.expando",
        "actions@odata.type": "#Collection(Microsoft.Dynamics.CRM.expando)",
        "actions": [
            {
                "title": "Open Account record",
                "data": {
                    "@odata.type": "#Microsoft.Dynamics.CRM.expando",
                    "type": "url",
                    "url": url,
                    "navigationTarget": "newWindow"
                }
            }
        ]
    }
    // ...
}
Title and Body Support Markdown
OverrideContent property.Here are the supported Markdown styles for notifications:
| Style | Markdown Syntax |
|---|---|
| Bold | **Bold** |
| Italic | _Italic_ |
| Unordered List | - Item 1\r- Item 2\r- Item 3 |
| Ordered List | 1. Green\r2. Orange\r3. Blue |
| Hyperlink | [Title](url) |
Example
To override the Title, add a hyperlink to the customer name in the Body, and italicize “please contact the customer in time”, modify the code as follows:
- Client API
this.ExampleCallAppNotification = function (executionContext) {
    var formContext = executionContext;
    var currentUserID = Xrm.Utility.getGlobalContext().userSettings.userId.replace("{", "").replace("}", "");
    var accountName = formContext.getAttribute("name").getValue();
    var sBody = `Customer [**${accountName}**] has been assigned to you, please contact the customer in time.`;
    var currentRecordId = formContext.data.entity.getId().replace("{", "").replace("}", "");
    var url = `?pagetype=entityrecord&etn=account&id=${currentRecordId}`;
    var tData = {
        "@odata.type": "Microsoft.Dynamics.CRM.expando",
        "actions@odata.type": "#Collection(Microsoft.Dynamics.CRM.expando)",
        "actions": [
            {
                "title": "Open Account record",
                "data": {
                    "@odata.type": "#Microsoft.Dynamics.CRM.expando",
                    "type": "url",
                    "url": url,
                    "navigationTarget": "newWindow"
                }
            }
        ]
    };
    var overrideContent = {
        "@odata.type": "#Microsoft.Dynamics.CRM.expando",
        "title": "**(Override)Client assignment reminders**",
        "body": `Customer [${accountName}](${url}) has been assigned to you, _please contact the customer in time_.`
    };
    var SendAppNotificationRequest = new this.SendAppNotificationRequest(
        "Client assignment reminders",
        `/systemusers(${currentUserID})`,
        sBody,
        200000000,
        100000001,
        200000000,
        null,
        overrideContent,
        tData
    );
    Xrm.WebApi.online.execute(SendAppNotificationRequest).then(function (response) {
        if (response.ok) {
            console.log("Status: %s %s", response.status, response.statusText);
            return response.json();
        }
    })
        .then(function (responseBody) {
            console.log("Response Body: %s", responseBody.NotificationId);
        })
        .catch(function (error) {
            console.log(error.message);
        });
};
The effect is as follows:
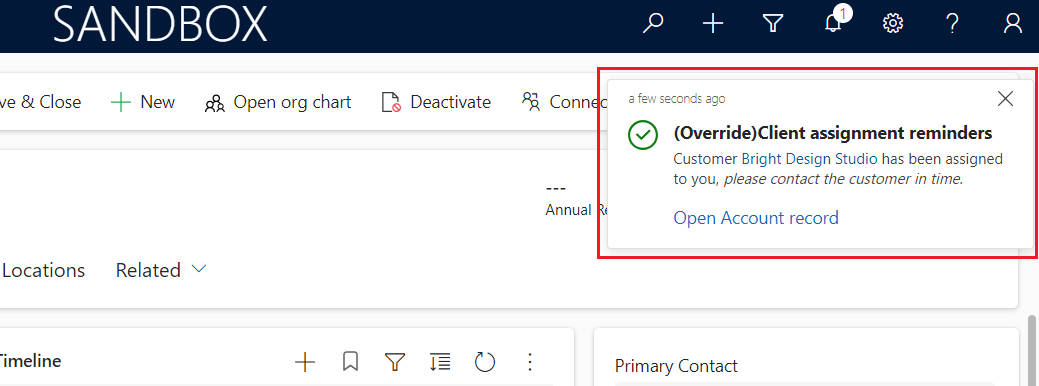
Override the notification’s Title and Body.
Important Considerations
1.Permissions Required: Users need the appropriate permissions to receive in-app notifications and send notifications to themselves or others.
| Table Name | Required Permissions | Notes |
|---|---|---|
| Send In-App Notification | Organization | |
| Notification | Create, Read, Write, Append, Append To | Required only if sending notifications by creating Notification records |
2.Storage Considerations: The Notification table consumes database storage capacity. Be mindful of the notification volume and expiration settings. It is recommended to set the Expiry property appropriately.
3.Notifications are user-specific. Each notification is intended for a single user and is addressed to the recipient when sent. Team notifications are not supported. If you need to notify multiple users, you must create a separate notification for each user.
Thank you for your patience in reading! Come pick an emoji or leave a comment!